Setup from A to Z
Semi-truck (tractor + 53' trailer)
Tractors and 53' trailers with drivers and an office, from the application to the first settlement. Pay per mile, office roles, factoring and IFTA are all covered. Every step says what to tap and what to type in each field, and why.
1
Apply and sign in
Registration is a short carrier application. We check it by hand, usually within one business day, and then open access. You do this once.
- Where to find it
- Website
- hamadev.net → Apply as a carrier
- iOS app
- App Store → HD Fleet → Log in (after approval)
- 1
Send the application (step 1 of 2)
Open the website and tap Apply as a carrier. Fill in the company and your name, then tap Next.
Fields
- Company name
- The legal or trade name you invoice under.Why: It goes on invoices and rate confirmations. You can change it later in your profile.Typical: Red River Freight Inc
- USDOT #
- Digits only, up to 8. Optional.Why: We check it in FMCSA SAFER by hand. It is printed on the truck door.Typical: 1234567
- MC #
- Digits only. Optional.Why: Your operating authority number; brokers and factors ask for it.Typical: MC-1122334
- Full namerequired
- First and last name of the account owner.Why: Shown to your drivers and in e-mails.Typical: Alex Morgan
- Phone
- A US phone number, 10 digits.Why: Only for questions about the application. Drivers never see it.Typical: (555) 010-0142
- E-mailrequired
- Your own e-mail. It becomes your login on the website and in the app.Why: The confirmation and the decision arrive here.
Common mistakesA USDOT or MC with letters or spaces: use digits only.Common mistakesAn e-mail that is already used: sign in or use Forgot password?.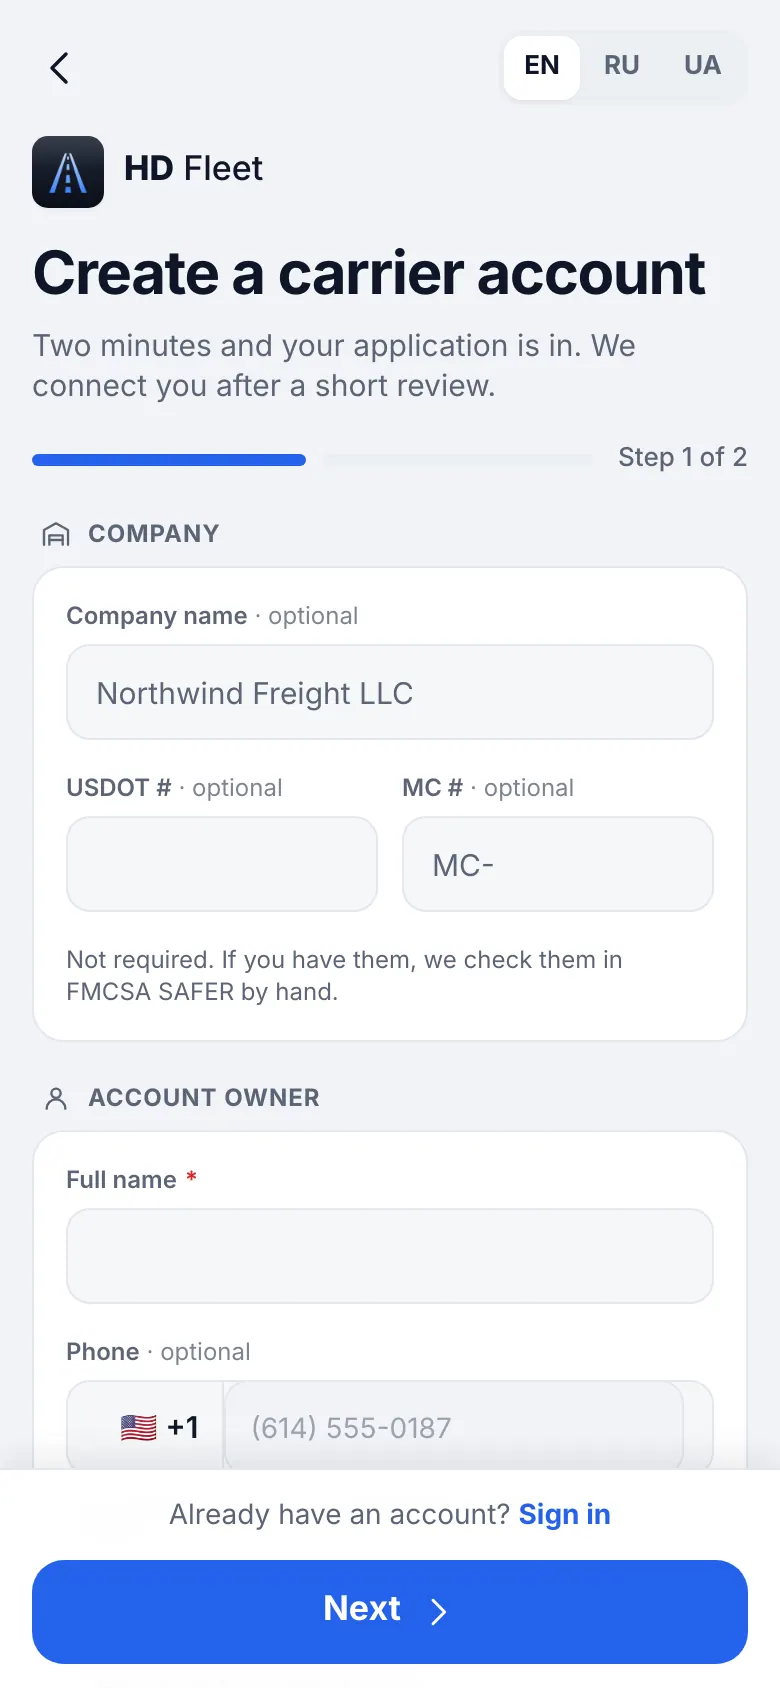
Website on a phone · The carrier application: company and owner, step 1 of 2 - 2
Choose a password and confirm (step 2 of 2)
Type the password twice, tick the consent to the Terms of Use and the Privacy Policy and tap Send application. The password needs 8 or more characters, a letter and a digit, and must not be the company name. A strength bar shows how safe it is.
What you will seeThe page Check your e-mail appears. Open the letter and tap the link; then wait for approval. We e-mail you when access is open.
Common mistakesNot confirming the e-mail: the application stays on hold until you do. - 3
Sign in on the website and in the app
Sign in on the website with the same e-mail and password. On the phone install HD Fleet from the App Store and tap Log in. Both show the same data: change a truck on the site and it is changed in the app.
TipUse the website at a desk and the app on the road.TipIf you switch on sign-in by code, a 6-digit code is e-mailed to you for each new device.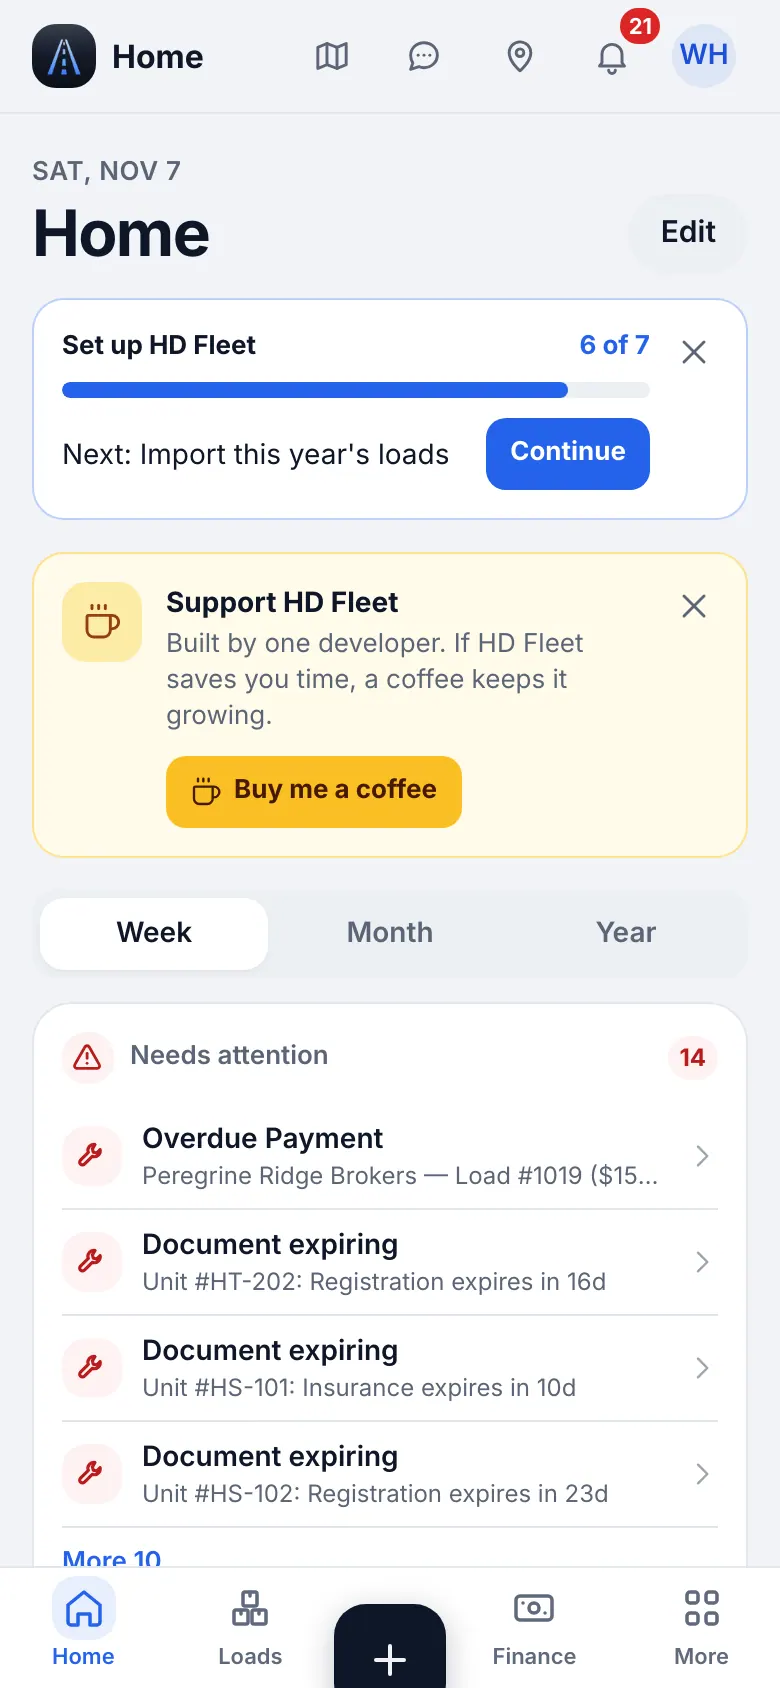
Website on a phone · Home on a phone 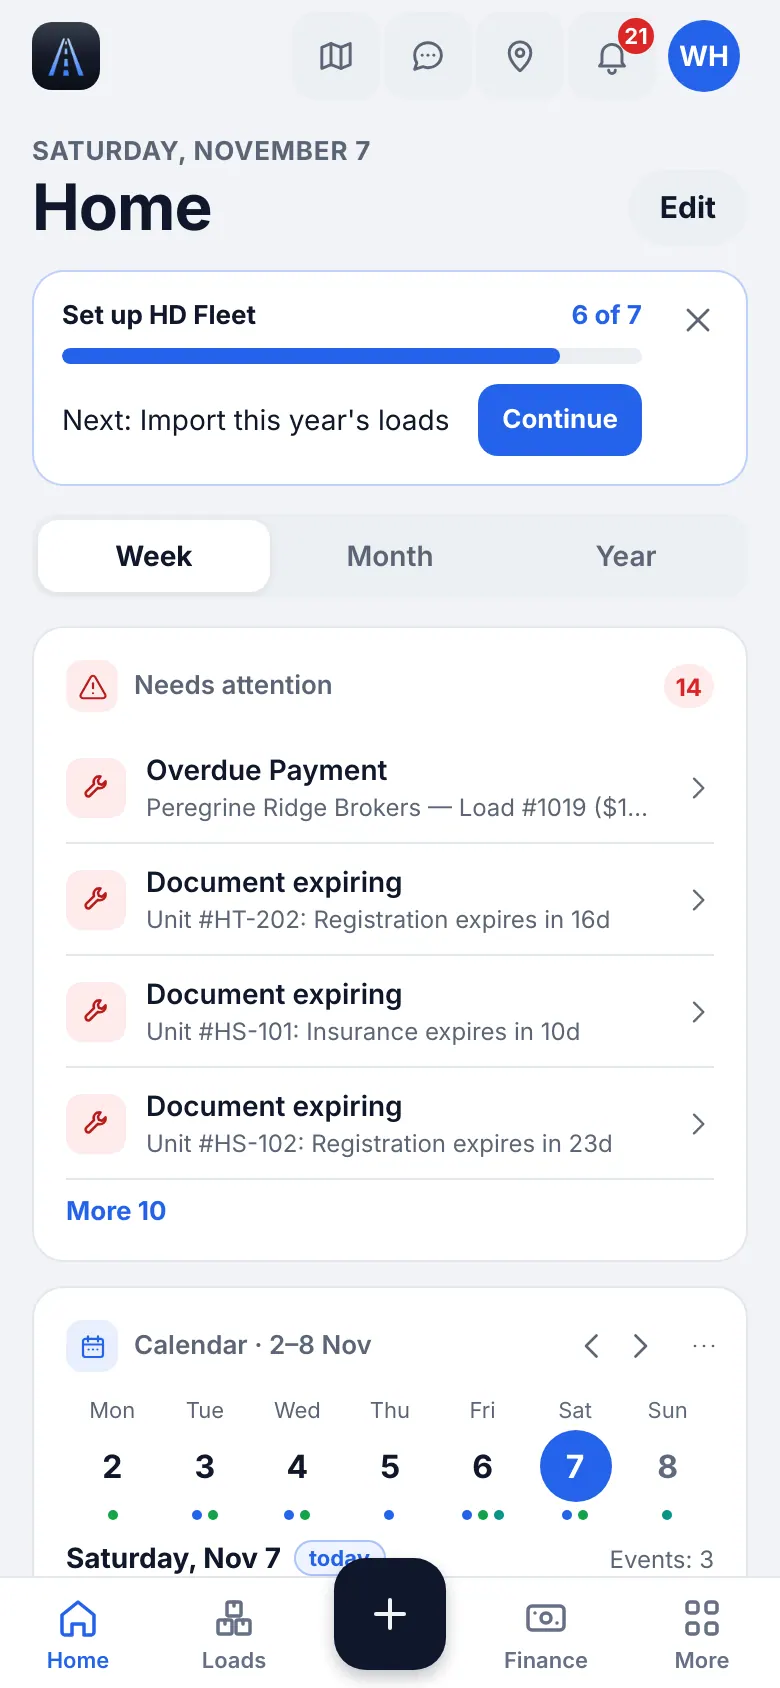
iOS app · Home in the iOS app
2
First steps: how you run your trucks
One question changes the whole app, so answer it first. The checklist on Home then walks you through the rest of this guide.
- Where to find it
- Website
- Home → checklist, or Settings → Company → First steps
- iOS app
- Home → checklist, or Settings → Company → First steps
- 1
Answer «How do you run your trucks?»
Choose I have drivers. You will invite drivers, set their pay and invite office people. Choose I drive my own truck only if you are a single owner-operator.
What you will seeHome shows the Set up HD Fleet checklist with a progress bar and the next step.
TipYou can switch later: Settings → Owner-operator mode, or Hire a driver.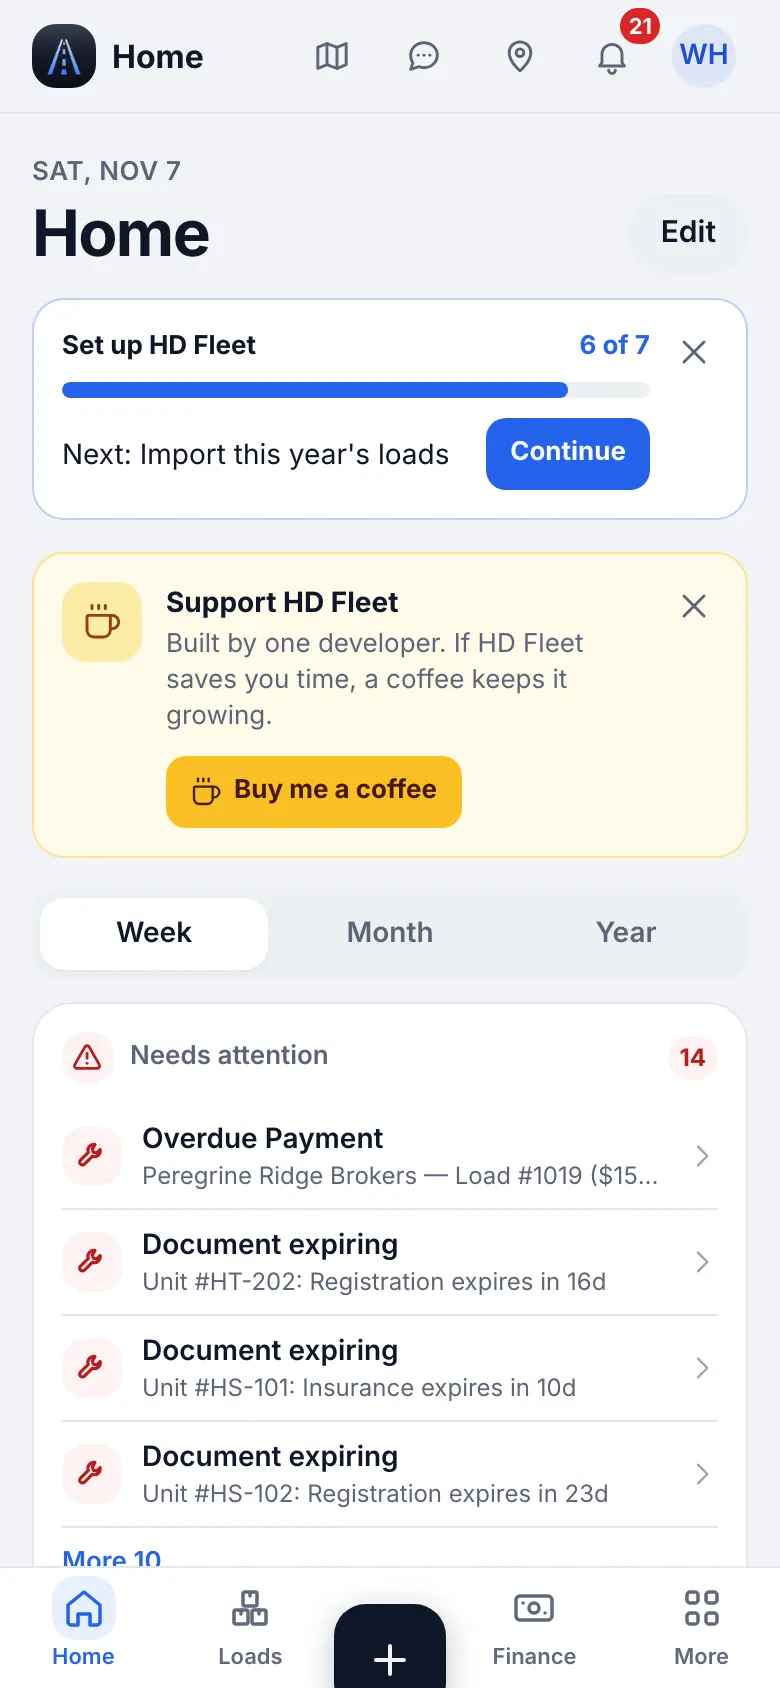
Website on a phone · Home with the «Set up HD Fleet» checklist card: progress and the next step 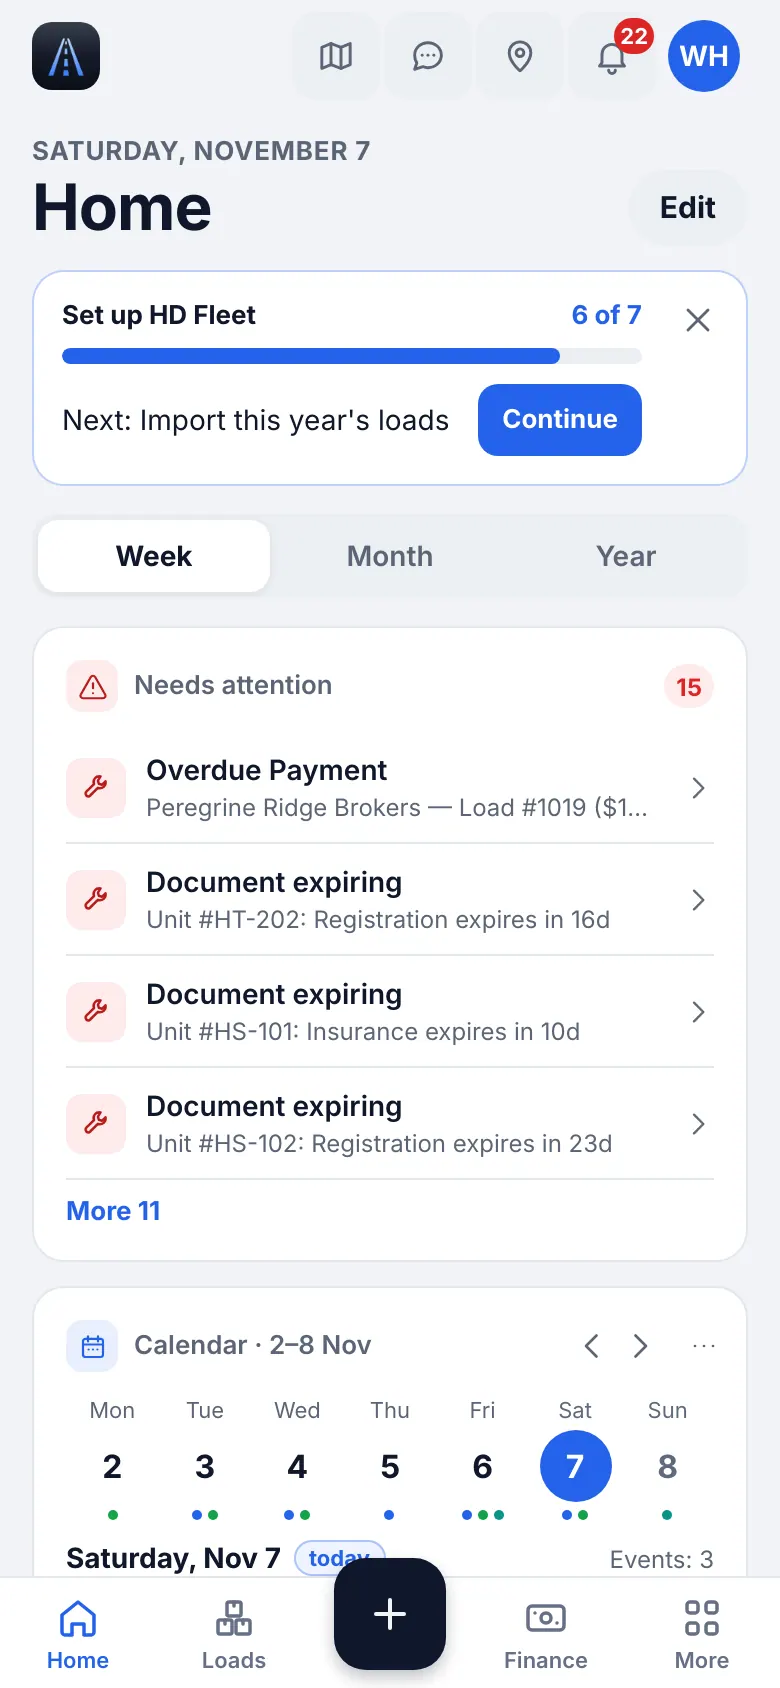
iOS app · Home in the app with the «Set up HD Fleet» checklist card - 2
Walk the checklist
The steps are Add a truck, Invite a driver, Create your first load and Set up driver pay. Optional rows are Add trailers, Invite dispatchers, Import brokers, Import this year's loads and Set up factoring. Skip moves on; the checklist comes back under Settings → Company → First steps.
3
Company card and factoring
The company card is what invoices, rate confirmations and e-mails show. It takes two minutes.
- Where to find it
- Website
- Settings → Company card
- iOS app
- Settings → Company card
- 1
Fill in the company card
Open your profile, then Company. Fill in the fields below and save.
Fields
- Company namerequired
- As on your insurance and authority.Why: Printed on invoices.
- Address, phone, e-mail
- The address brokers pay to and the e-mail they write to.Why: Invoices show them; brokers reply to this e-mail.
- USDOT and MC
- Same numbers as in the application.Why: Brokers, factors and the IFTA report use them.
- Logo (optional)
- A square picture.Why: It appears on the invoice PDF.
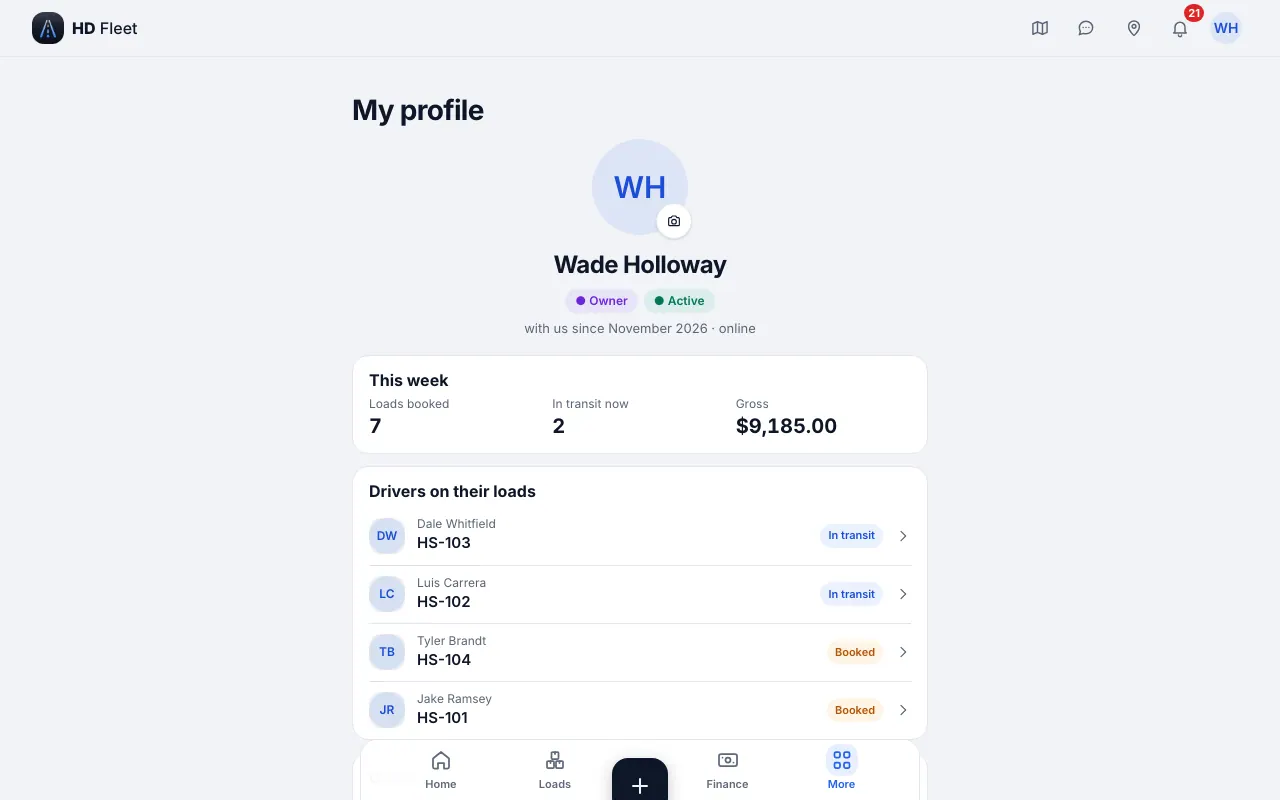
Website · Profile and company card 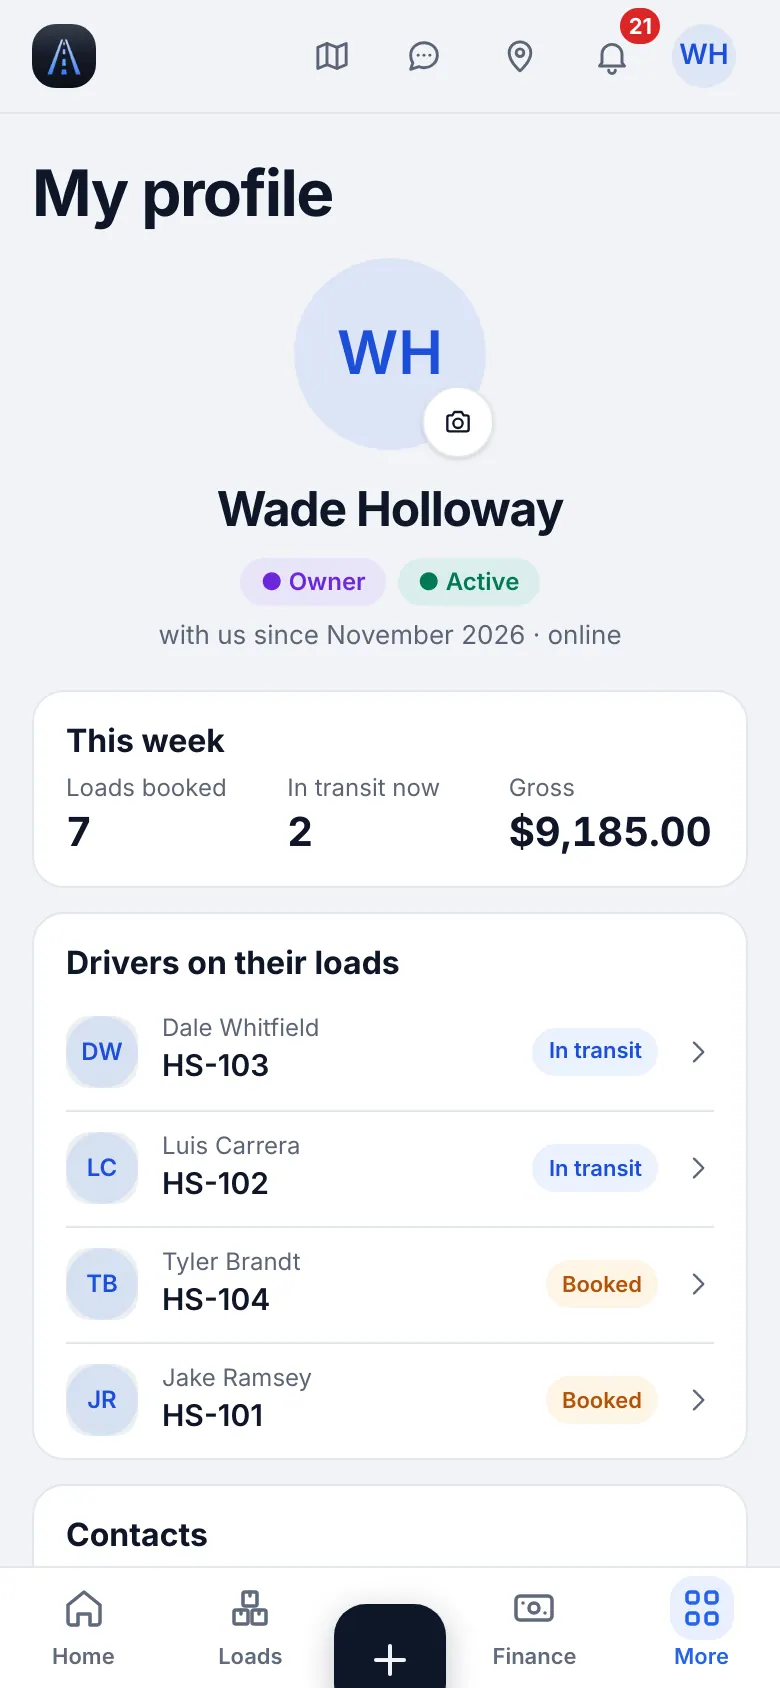
Website on a phone · Profile and company card on a phone - 2
Set up factoring (only if a factor buys your invoices)
Without a factor you invoice the broker and collect yourself: skip this step. With a factor, open Settings → Company card → Factoring and enter the terms your factor gave you. The form shows an example of one invoice split into advance, fee and reserve.
Fields
- Factor name
- The name of the factoring company.Typical: Summit Capital Factoring
- Fee, %
- What the factor keeps.Why: Taken off every invoice.Typical: 3
- Advance, %
- Paid to you right after you send the invoice.Typical: 90
- Reserve, %
- Held until the broker pays; released minus the fee.Typical: 10
- Recourse, days
- After this many days an unpaid invoice comes back to you.Typical: 90
TipTo stop using a factor choose Switch off factoring.CarefulFee and advance together cannot be more than 100%. New terms apply to invoices you send afterwards, not to ones already sent.
4
Add tractors and 53' trailers
A truck is the center of the books: loads, fuel, expenses, driver pay and profit are counted per truck. A trailer is its own unit that you pick on a load.
- Where to find it
- Website
- Fleet → Trucks & trailers → Add vehicle
- iOS app
- Fleet → Trucks & trailers → Add vehicle
- 1
Create the tractor
Tap Add vehicle. Under Unit keep Truck, then choose the vehicle type: Semi Truck. The form shows what the type needs. Scan registration — fill everything reads the registration photo and fills most fields for you: check them afterwards.
Fields
- Vehicle typerequired
- Semi Truck.Why: Sets service intervals and the weight checks.
- Truck Name
- Leave it blank for an automatic name like TRK-001.Typical: T-101
- Unit No
- The number brokers and carriers know the truck by.Why: Your own fleet number; shown on loads and in reports.Typical: 1001
- Fuel Type
- Diesel.Why: Used in fuel logs and IFTA.
- Year, Make, Model
- From the registration.Typical: 2020, Freightliner, Cascadia
- License Plate and State
- Plate and the state of registration.Why: Documents and expiry reminders use them.
- VIN Number
- 17 characters. Fill from VIN fills the make and model.Why: Parts lookup and service history use it.
- DOT/MC Number
- The authority this truck runs under.Why: Shown on documents.
- Payload (lbs)
- Leave 0 for a tractor; put the payload on the trailer.Why: The load form warns when a load is heavier than the truck can carry.Typical: 0
- GVWR (lbs)
- Gross vehicle weight rating, on the door sticker.Why: One of the weight limits the load form checks.Typical: 52,000
- GCWR (lbs)
- Gross combined weight rating: truck plus trailer plus cargo.Why: The load form warns when truck, trailer and cargo are together over this.Typical: 80,000
Common mistakesSkipping GVWR and GCWR on a hotshot or semi: the overweight warning on loads then has nothing to check against.Common mistakesTyping a license plate with spaces: use the plate as printed.Your operation · Tractor
A tractor has no body dimensions. The trailer carries the cargo, so you describe it as a separate unit next.
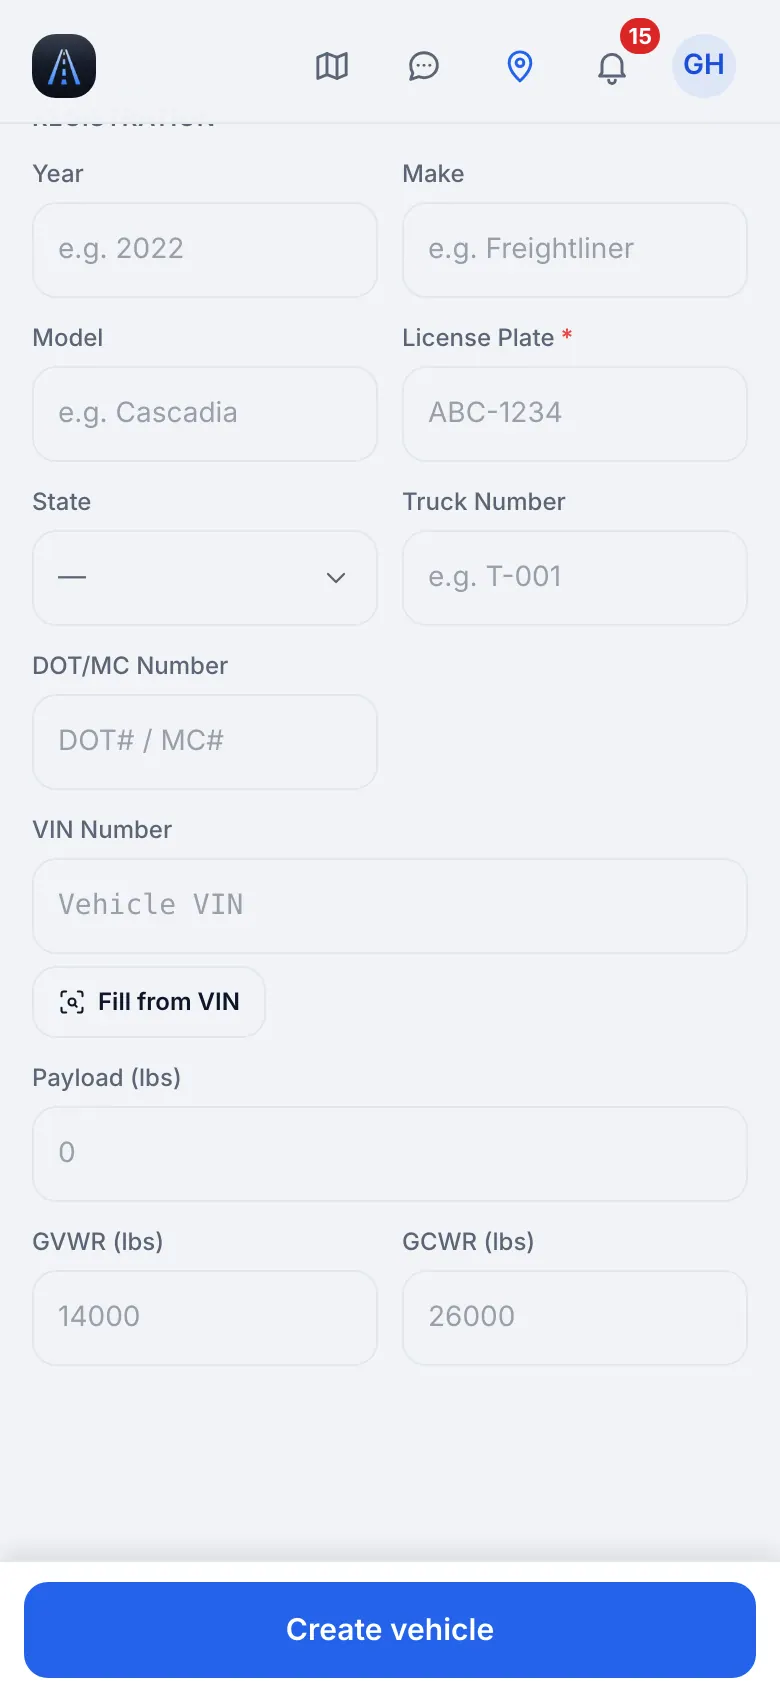
Website on a phone · New vehicle: Semi Truck - 2
Who drives and how you pay
In the section Who drives and how we pay choose Owner-driver if you drive this truck, or Hired driver if someone else does. For a hired driver pick a person in Assign Driver or tap Quick-add new driver (name, e-mail, phone, then Create & Assign). Then choose the pay type.
Fields
- Owner Typerequired
- Owner-driver or Hired driver.Why: Owner-driver means no driver pay: profit is revenue minus costs.
- Pay Type
- % of gross, Per Mile or Flat per Load.Why: How a hired driver's share is counted. A pay scheme set on the driver himself overrides it.Typical: Per Mile
- Rate
- A percent, dollars per mile or dollars per load, depending on the pay type.Why: The hint under the field shows how it is used.Typical: 0.60 ($/mile)
What you will seeTap Create vehicle. The truck opens on its own card and appears in the Vehicles list. Home now shows it.
Common mistakesChoosing Hired driver with no driver: you can add the driver later, but loads that are not drafts need a driver on the truck.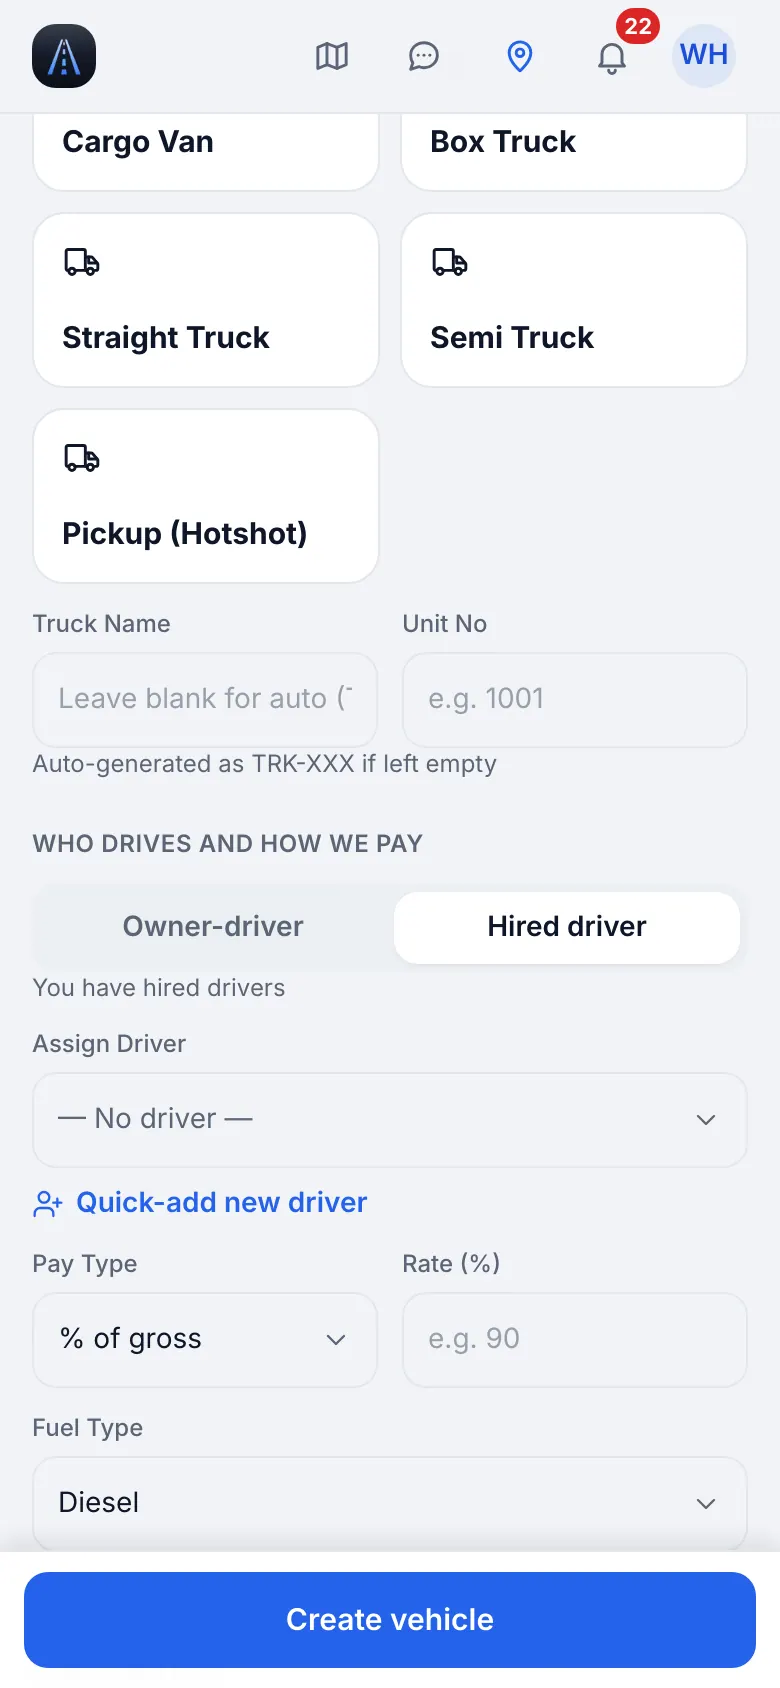
Website on a phone · New vehicle: who drives and how you pay - 3
Add the 53' trailer
Tap Add vehicle again and under Unit choose Trailer. A trailer type is required: Dry Van (or Reefer, Flatbed). Give it a name and a unit number and enter its capacity. Pick this trailer on every load: the weight check compares the cargo with the truck and trailer pair.
Fields
- Trailer Typerequired
- Dry van, reefer or flatbed.Why: Required for a trailer.
- Truck Name and Unit No
- A name and the number painted on the trailer.Typical: TR-5301 / 5301
- Payload (lbs)
- What the trailer can carry.Why: Checked against the cargo weight on each load.Typical: 45,000
TipOpen Equipment on the trailer and fill in the deck length, dovetail, ramps and the securement gear. Trailer space then shows how full the deck is, and Find a partial lists loads that still fit.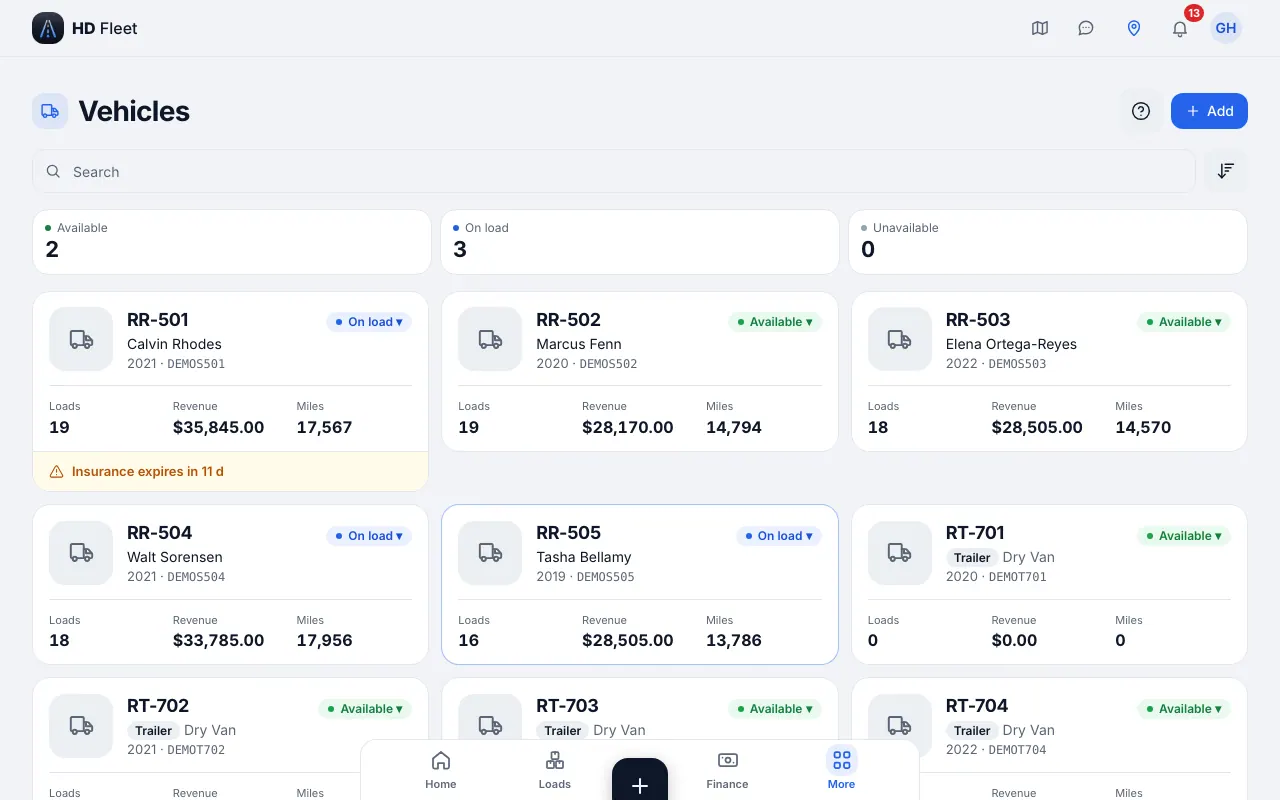
Website · Semi fleet: trucks and 53-foot dry van trailers - 4
Check the truck list
Open Fleet → Trucks & trailers. Each truck is a card. Tap one to see its profit, expenses, fuel logs, documents and service book.
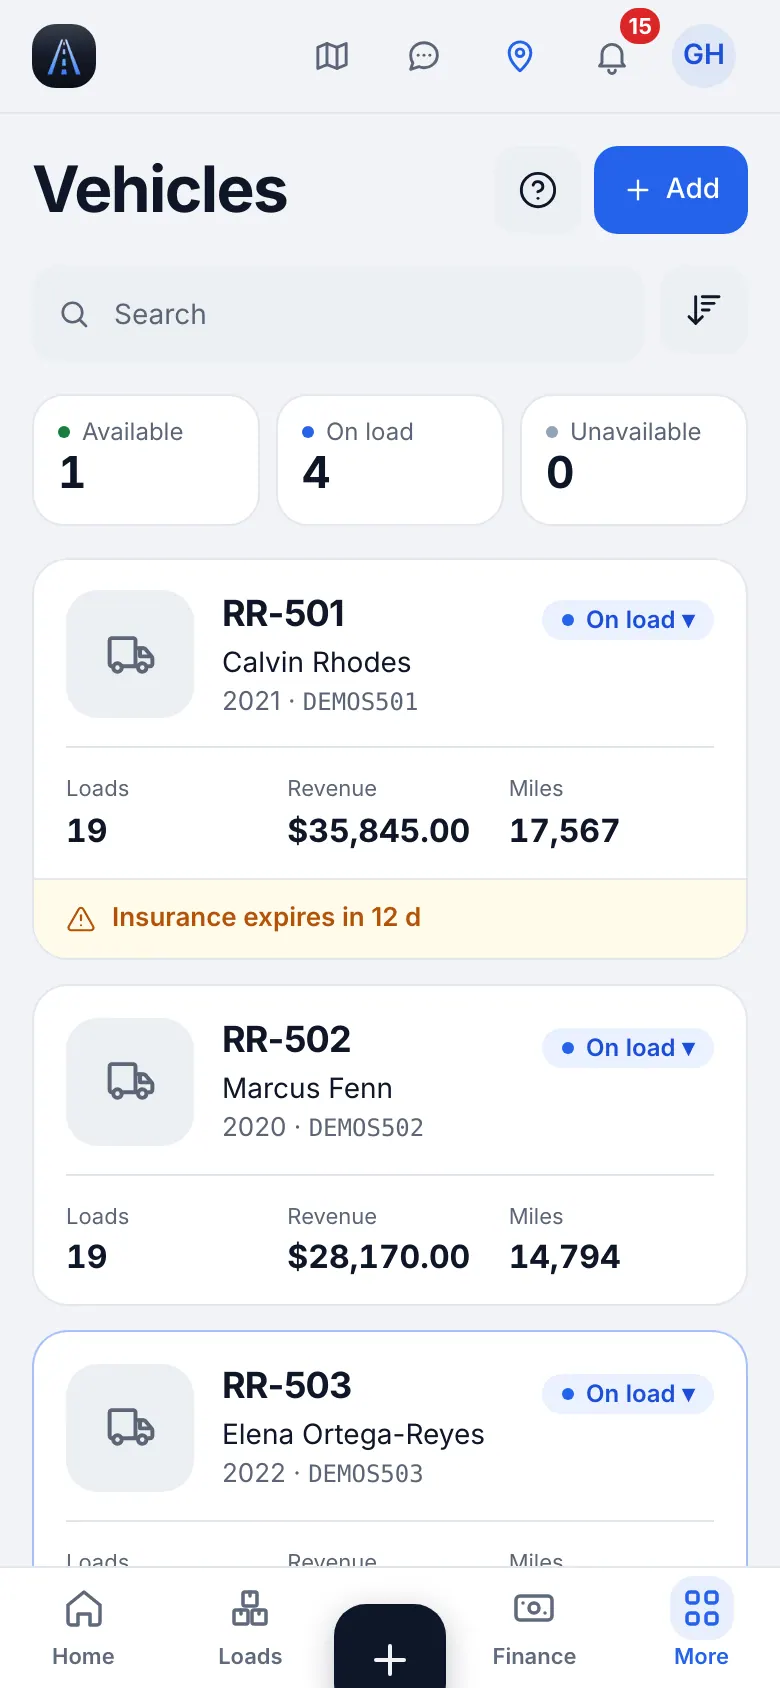
Website on a phone · Vehicles on a phone (semi demo company)
5
Service starting point
Tell the app when each job was last done, so service reminders are right from day one. Without it the reminders start counting from today.
- Where to find it
- Website
- Vehicle → Maintenance → Set up
- iOS app
- Vehicle → Maintenance → Set up
- 1
Open «Service starting point»
After you create a truck, or later from the banner on its service book (Set up), open Service starting point. It says So reminders work from day one.
Fields
- Odometer nowrequired
- The mileage on the dashboard today.Why: Everything is counted from this number. Then it grows by itself from fuel receipts and load miles.Typical: 438,000
- Last done
- For every job (oil, brakes, tires, inspection ...) type the miles or the date of the last time: miles like 146,000, or a date like 03/2027.Why: The next due point is worked out from it.Typical: Oil change: 430,500
- Valid until
- For an inspection or a registration, the date it is valid until.Why: You are reminded before it runs out.Typical: 03/2027
What you will seeEach row shows a preview such as “Oil change: next in 4,800 mi.” Tap Done.
TipDo not remember? Choose Don't know — count from today. It is fine: the first service record fixes it.TipChoose Later to skip this and do it from the service book.Common mistakes“Last done” miles higher than the odometer, or a date in the future: the form refuses both.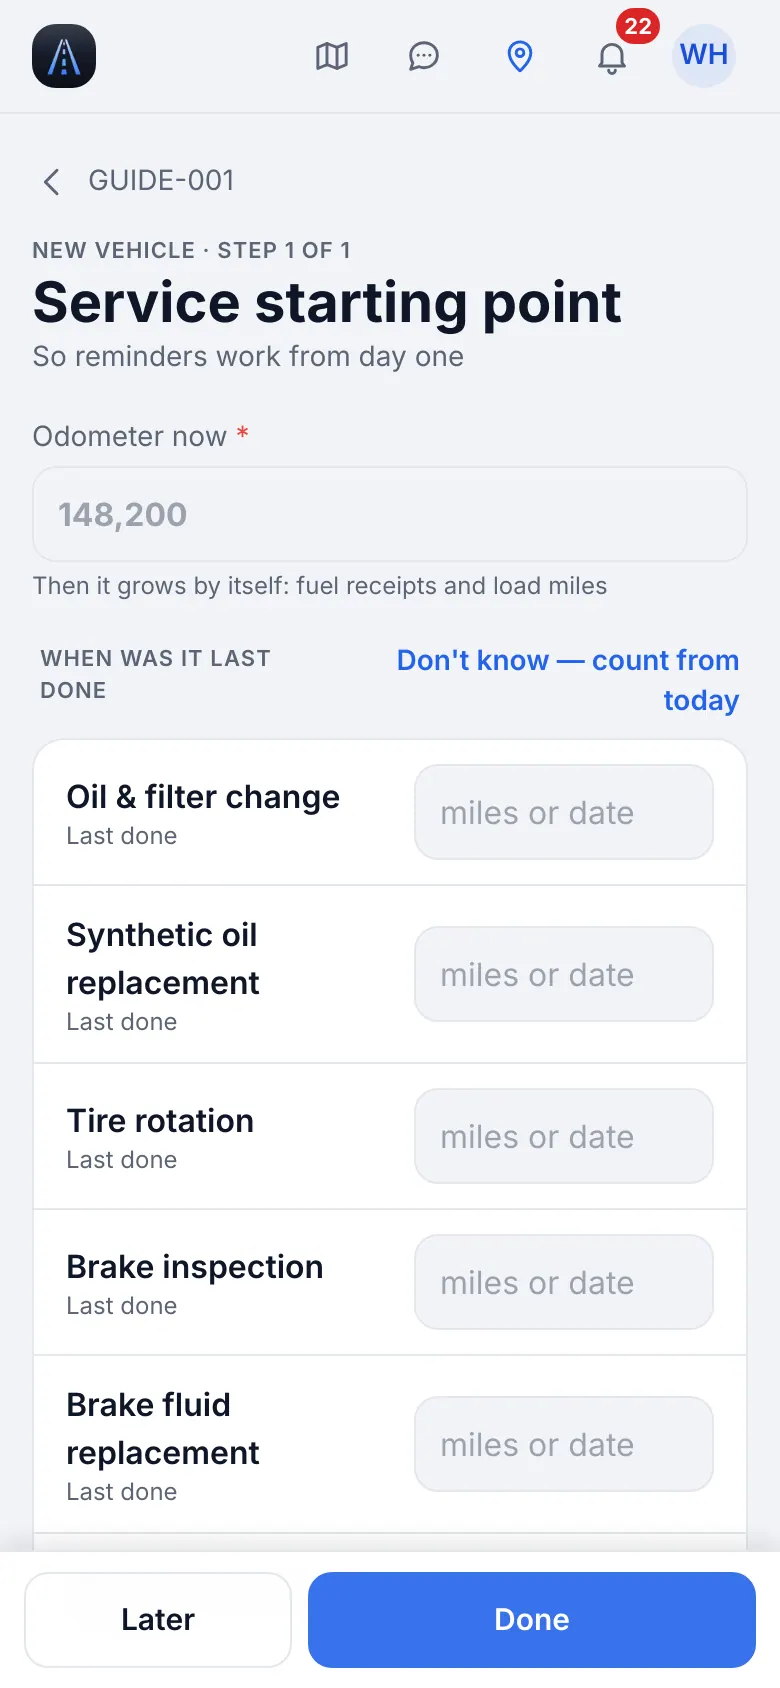
Website on a phone · Service starting point: odometer and when each job was last done
6
Drivers: invite, QR sign-in and pay
Each tractor needs a driver. You create his account, assign a truck and decide how he is paid. His personal data he enters himself.
- Where to find it
- Website
- People & compliance → Team → Add Employee
- iOS app
- People & compliance → Team → Add Employee
- 1
Add the driver
Open Team and tap Add Employee. Choose the role Driver, fill in the fields and tap the Add Employee button at the bottom of the form.
Fields
- Rolerequired
- Driver.
- Namerequired
- Full name.Typical: Sam Rivera
- Emailrequired
- His own e-mail: it is his login.Typical: sam.rivera@example.com
- Passwordrequired
- 8+ characters with a letter and a digit. He can change it, or sign in with a QR code instead.
- Assign to Truck
- The truck he drives. You can also do it later on the truck card.Why: Loads of that truck go to this driver by the pickup date.
- License type
- CDL or Non-CDL.Why: Drives the expiry reminders and the document checklist.
- Employment type
- Company driver, or Owner-operator.Why: Decides which pay and tax documents (W-9) apply.
TipMany drivers at once: Workspace → Import data → Trucks and drivers. Each driver gets an e-mail to set his own password.TipLicense number, SSN and bank details are never typed by the owner: the driver enters them himself.Common mistakesA typo in the e-mail: the driver cannot reset the password. Check it before you save.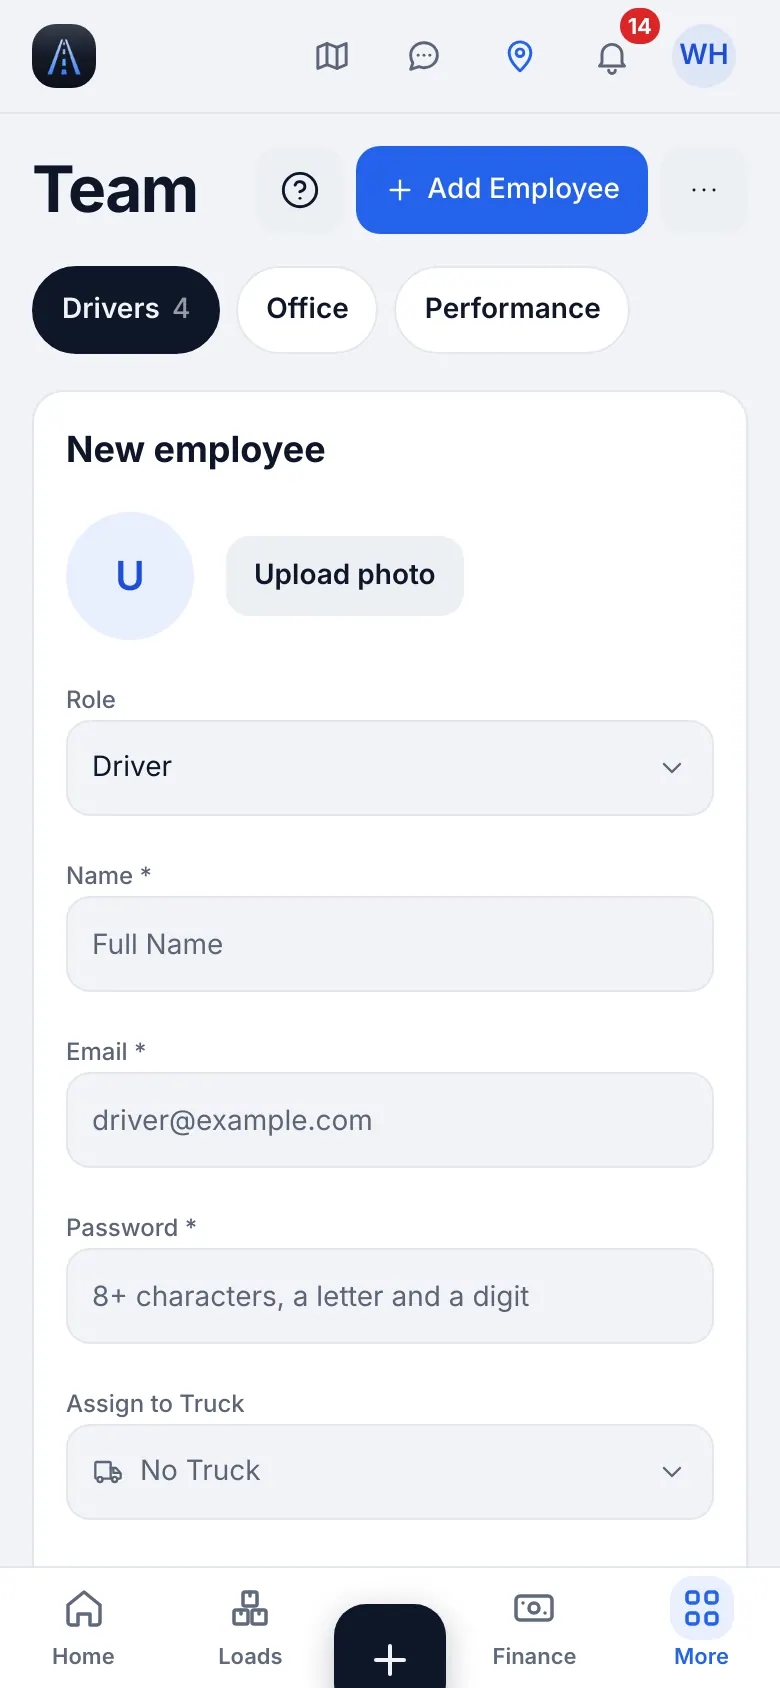
Website on a phone · Add Employee: role, name, e-mail, password and truck 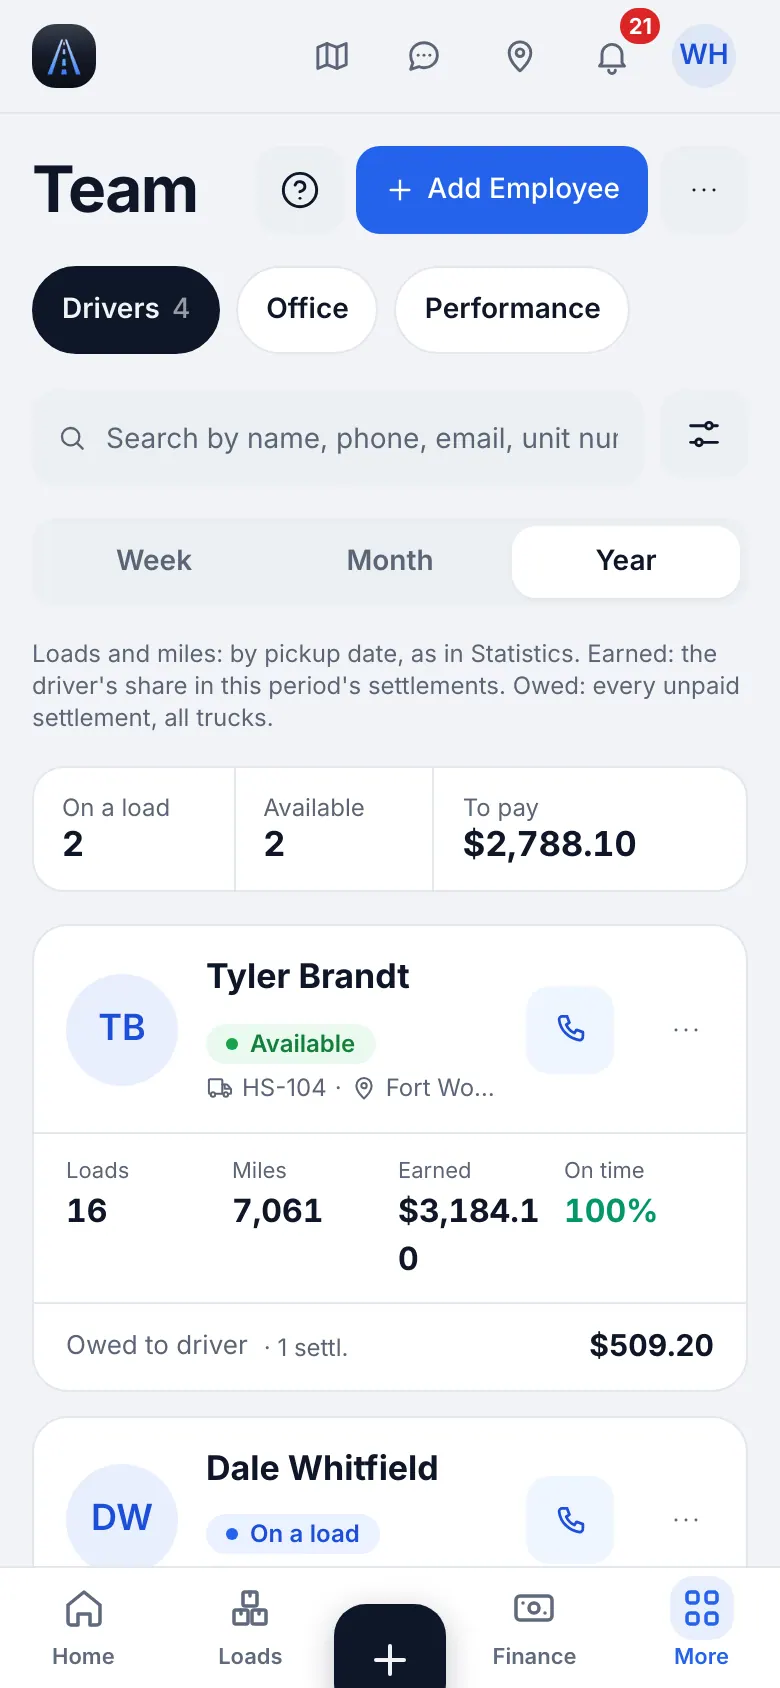
Website on a phone · Team on a phone - 2
Give him a way in: QR code, password or link
The easiest is the QR code. On the Team list tap the three dots on the driver's card, choose Password & login and open the QR code tab: a one-time QR code appears. The driver installs the app, taps Sign in with QR and points the camera at your screen. The code works once and for 10 minutes; his password does not change. No camera? He taps Enter code manually and types the Code to type by hand below the QR. You can also Send sign-in link by SMS or e-mail.
TipExpired? Tap New code: the old one stops working.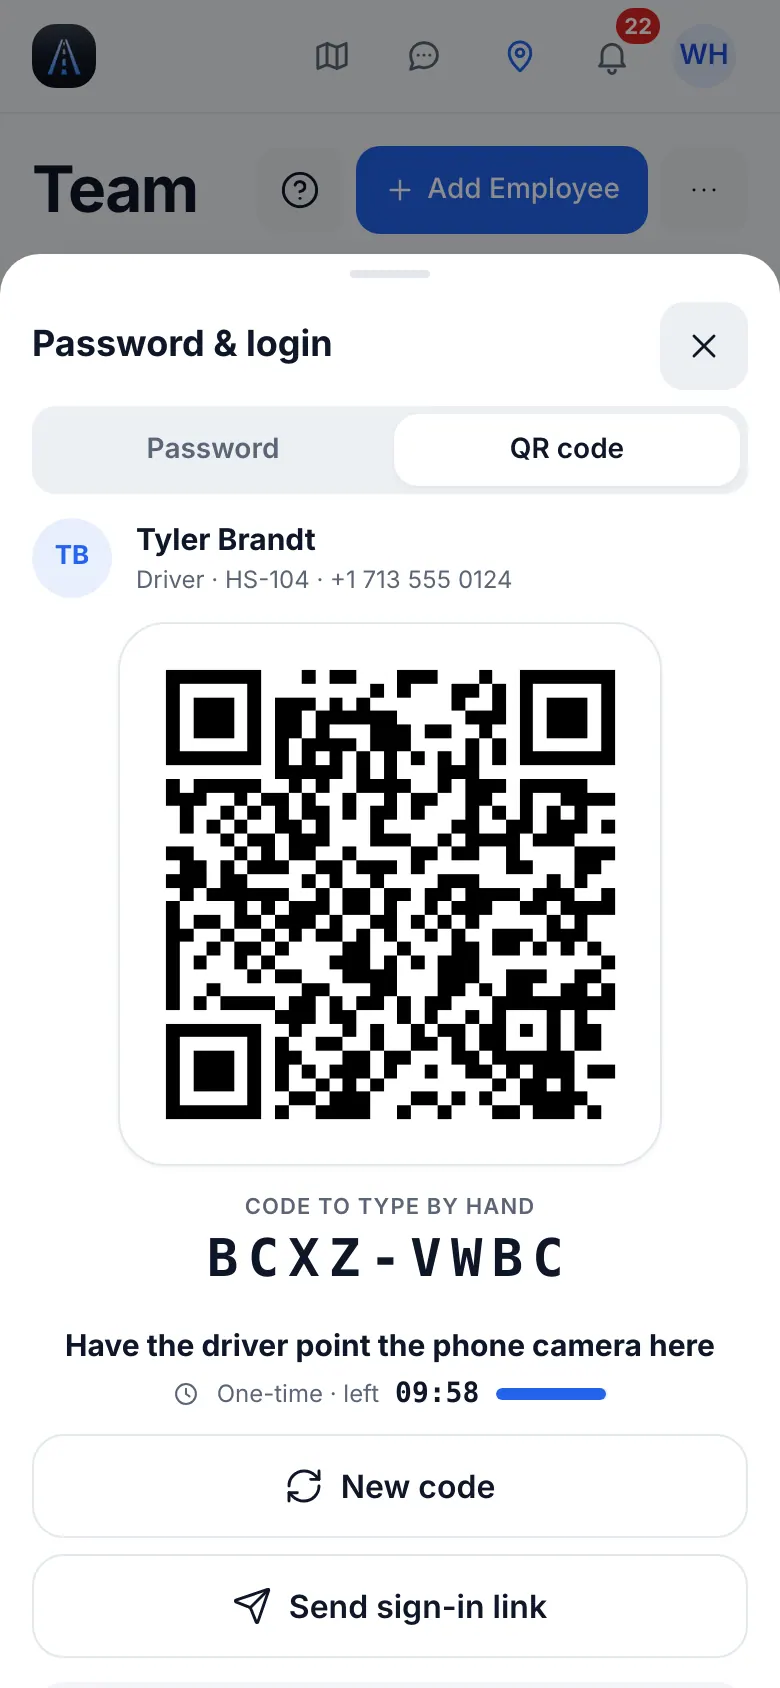
Website on a phone · The one-time QR code that signs a driver in 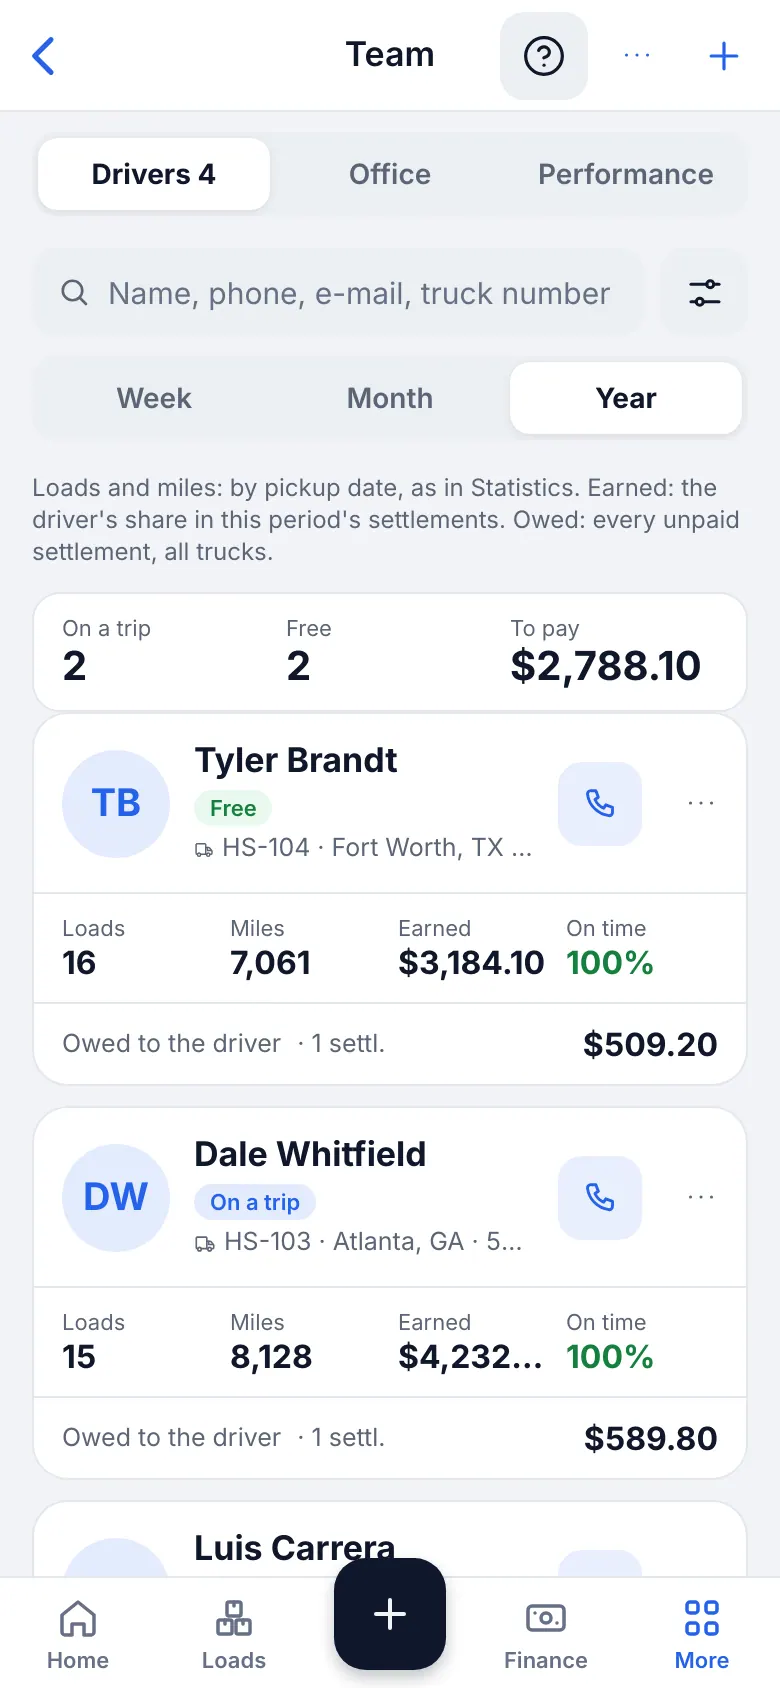
iOS app · Team in the app - 3
Choose how the driver is paid
Open the driver and find Base pay scheme. Set own scheme lets you choose % of gross, $ per loaded mile or $ per load and enter the rate. Use the truck's rate removes his own scheme. His own scheme works on any truck he drives; without it the truck's rate from Who drives and how we pay applies.
Fields
- Base pay schemerequired
- % of gross, $ per loaded mile or $ per load.Typical: $0.60 per loaded mile
- Empty (deadhead) miles
- Not paid (default), Same rate or Separate rate with Rate, ¢ per mile.Why: Only for per-mile pay. Empty miles are the ones entered on each load.Typical: 25
Your operation · Semi
Cents per loaded mile is common for semi. Decide about empty miles in the next step.
7
Office: dispatcher, accountant, safety, HR
Office people get their own role and see only what they need. A dispatcher books loads, an accountant sees money read-only, safety and HR see documents and service.
- Where to find it
- Website
- People & compliance → Team → Add Employee; Finance → Dispatcher pay tab
- iOS app
- People & compliance → Team → Add Employee; Finance → Dispatcher pay tab
- 1
Add the person
Team → Add Employee. Choose the role: Dispatcher, Tracker, HR, Safety or Accountant. The fields are the same as for a driver: name, e-mail, password. Each role sees only its own screens: a dispatcher sees loads and the map, an accountant sees finance read-only.
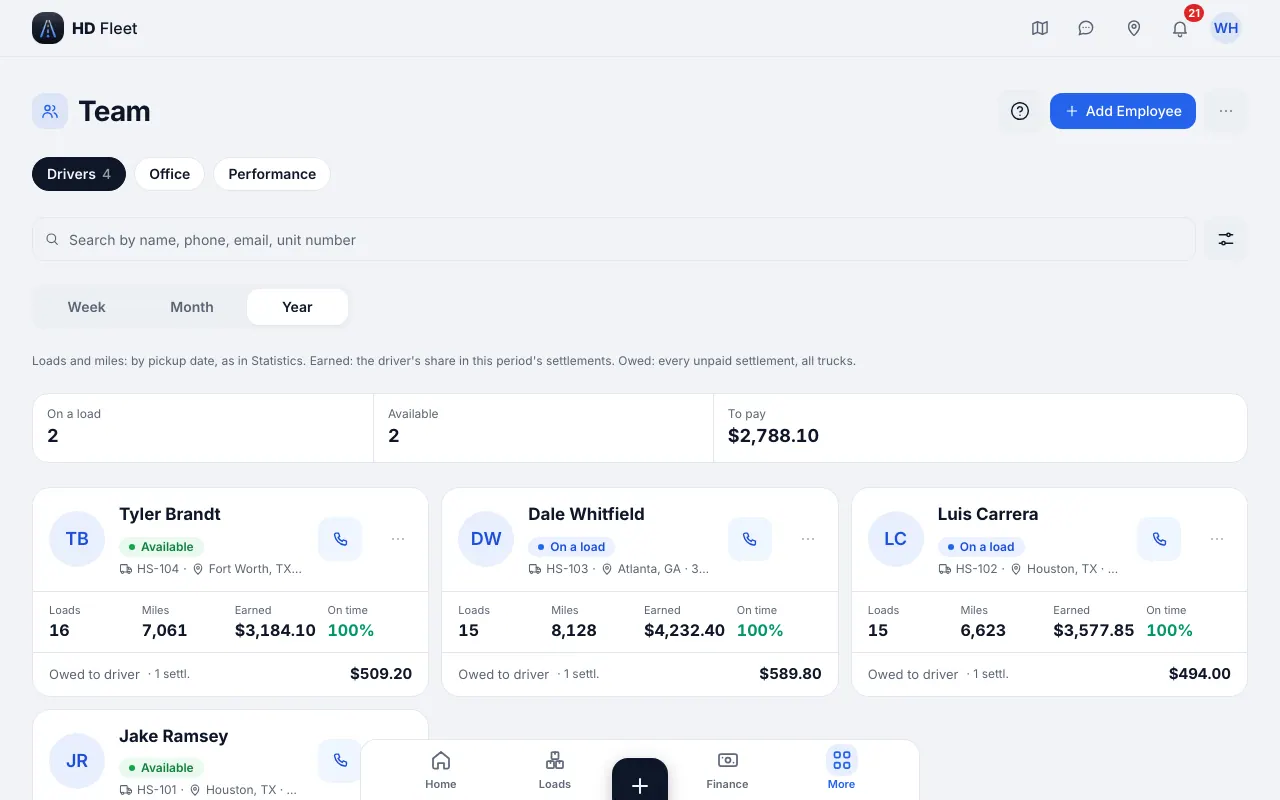
Website · Team: drivers and office people - 2
Set the dispatcher's percent
Open the dispatcher's profile and set Pay: % of load gross. It applies to loads he is assigned to. The Dispatcher field of a load defaults to whoever creates it.
Fields
- Pay: % of load gross
- The dispatcher's commission.Why: The payout screen adds it up per period.Typical: 8
CarefulChanging the percent later does not change old loads: each load keeps the percent it was saved with. - 3
Pay the dispatcher
Finance → Dispatcher pay tab lists loads, gross and commission for a period. Tap Mark as paid when you pay. Reopen undoes a payout.
8
Brokers and companies
A broker record keeps contacts, payment terms, the billing e-mail and what the broker owes you.
- Where to find it
- Website
- Dispatch → Brokers & customers
- iOS app
- Dispatch → Brokers & customers
- 1
Add a broker
Open Brokers & customers and add a company. If one with the same MC already exists you are told, so you never create a duplicate. Use Look up on FMCSA SAFER to check the status before you haul.
Fields
- Namerequired
- The broker's company name.Typical: Northline Logistics Group
- MC # and DOT #
- Digits from the broker's authority.Why: Prevents duplicates and lets you check the broker on SAFER.
- Address, contact, phone
- Dispatch contact for the loads.
- Billing e-mailrequired
- The address that receives invoices.Why: If it is empty the general e-mail is used. Reminders use it too.
- Payment terms
- Days until the broker pays.Why: Drives the due date and the aging report.Typical: 30
- Approved by factor
- Tick if your factor approved this broker.Why: Invoices to an unapproved broker show a warning.
TipThe shared directory of brokers is read-only: tap Make my own copy to edit payment terms and the billing e-mail.TipLots of brokers: Workspace → Import data → Brokers (see the import hub).TipBrokers can also send you loads: see Dispatch → Loads from brokers (Full plan).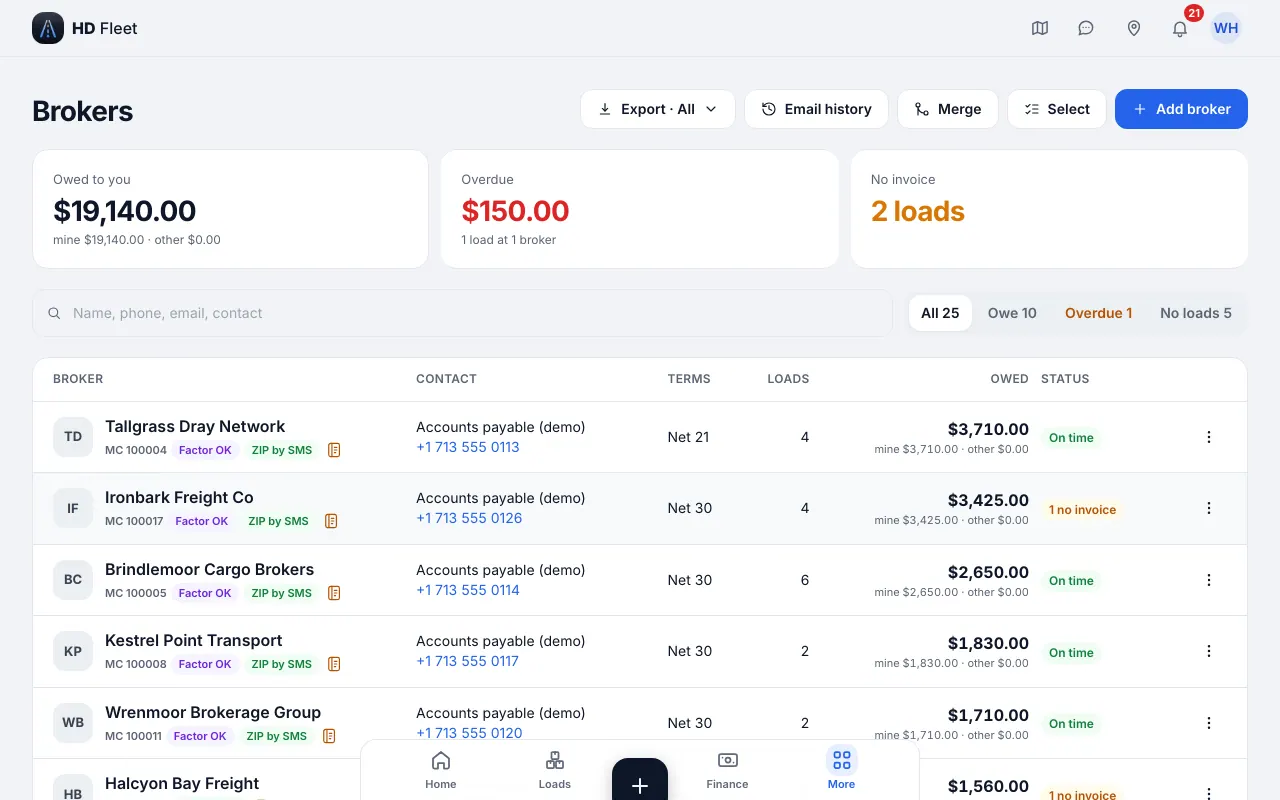
Website · Brokers list with what each owes you 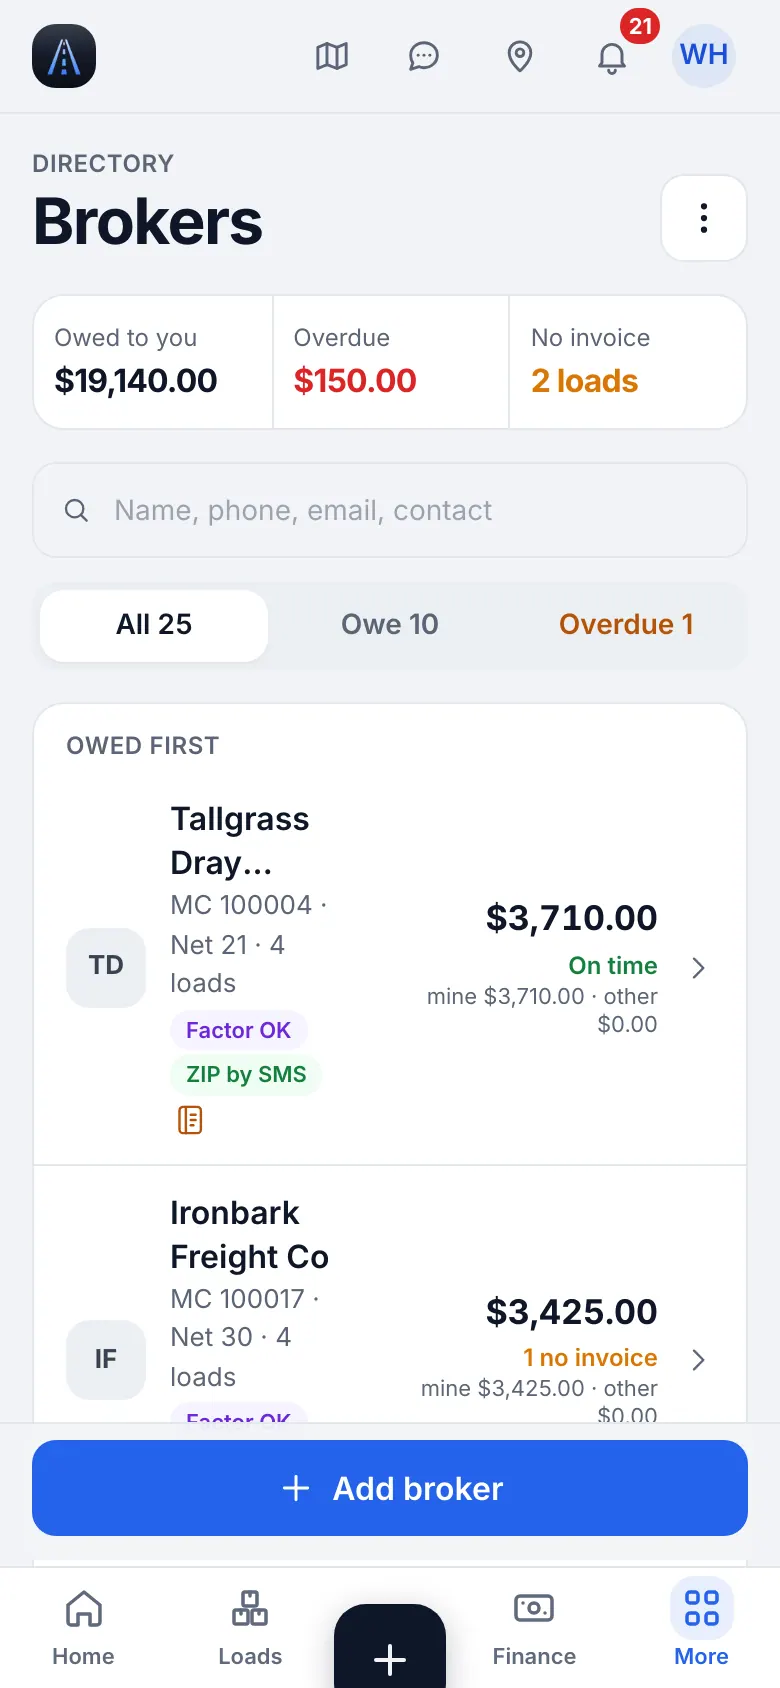
Website on a phone · Brokers on a phone
9
Your first load
A load is the base of the books: driver pay, the invoice, the settlement and profit are counted from it. A broker, a route, dates and a rate are enough to start.
- Where to find it
- Website
- Loads → Add load
- iOS app
- “+” → Add load
- 1
Start with AI autofill (optional)
Paste the text of the broker's e-mail or rate confirmation into the autofill box, or upload a photo or PDF (under 10 MB), then tap Fill in. AI fills pickup, delivery, dates, rate, weight and the broker. Fields it is not sure about are listed under Check these. You always check before saving.
TipA broker that is not in your list is offered for adding.TipAutofill not connected? Just type: what you typed is kept.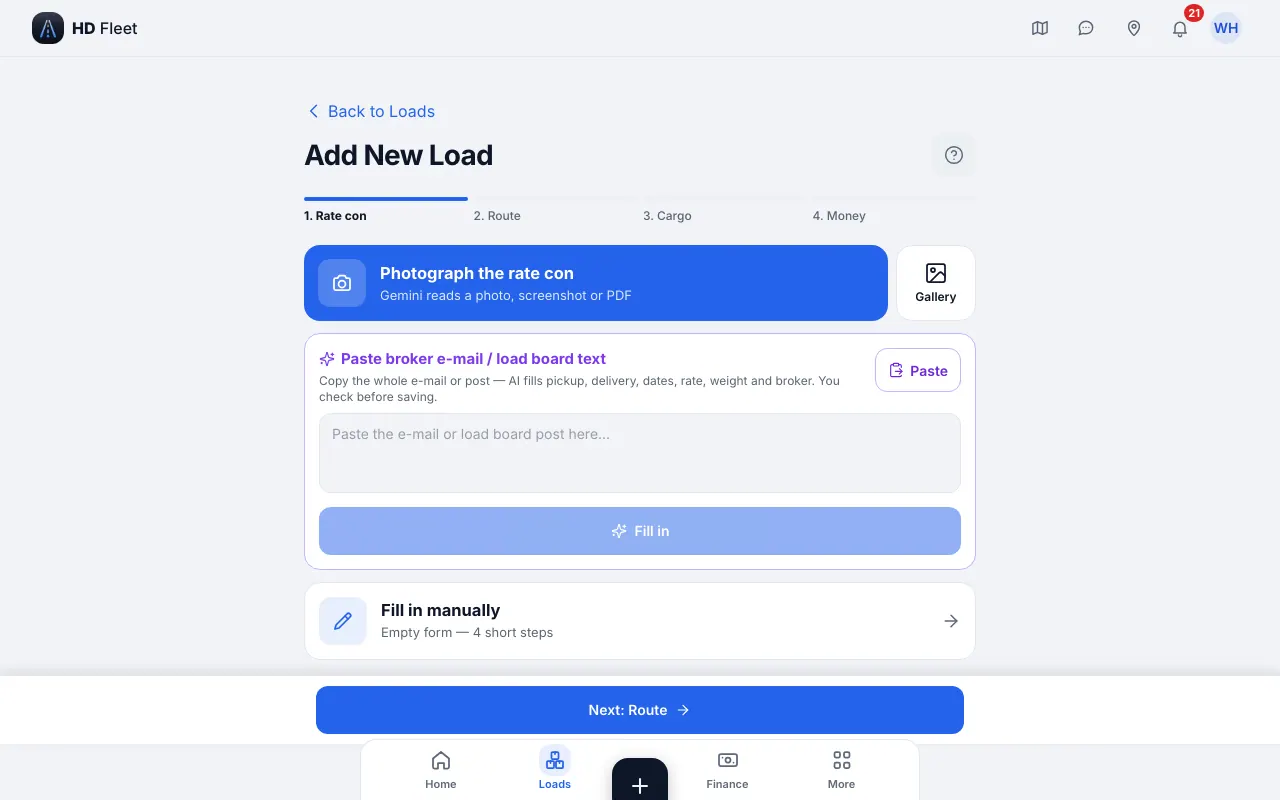
Website · New load form 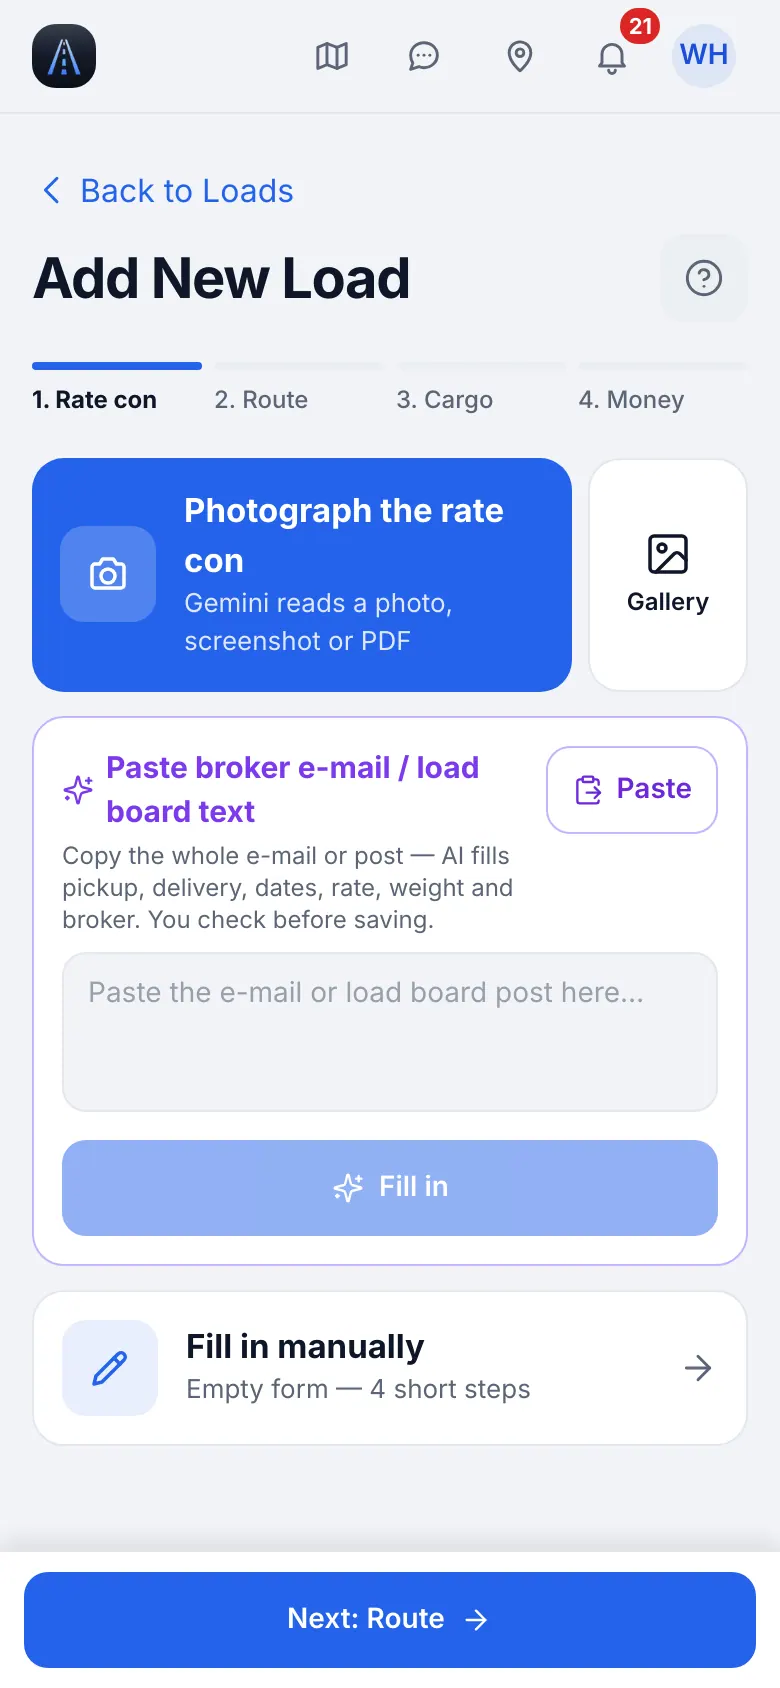
Website on a phone · New load form on a phone - 2
Fill in the form
Fields marked with an asterisk are required. Start typing a city, or enter a ZIP and the city fills in.
Fields
- Vehiclerequired
- The tractor.Why: The load goes to the driver who drives that truck on the pickup date.
- Trailer
- The 53' trailer.Why: The weight check uses the truck and trailer pair.
- Company (Broker)
- The broker that booked the load.Why: Invoices and what the broker owes you are counted per broker.
- Pickuprequired
- City and state or ZIP, the date, a time as exact or as a window, and the full street address in the stop card.Why: The driver navigates to it; delivery cannot be earlier than pickup.Typical: Dallas, TX
- Add Drop Off
- Another stop. Use Make it a drop or Make it a pickup to change its kind and the arrows to reorder.Why: Each stop has its own steps for the driver.Typical: Jackson, MS
- Payment ($)required
- The rate in dollars.Why: Rate per mile under it lets you check the rate.Typical: 2,600
- Loaded Miles and Empty Miles
- Miles of the route; empty miles are the deadhead before pickup.Why: Rate per mile, per-mile driver pay and IFTA use them.Typical: 1,050 / 80
- Weight (lbs)
- The cargo weight.Why: The form warns when it is over the truck, the trailer or the combined limit.Typical: 38,000
- Layover, Detention, Hand load / unload
- Extras the broker agreed to.Why: They are added to the invoice and the effective rate per mile.
- TONU / Cancellation fee
- Only for a cancelled load.Why: A cancelled load counts the fee, never the rate.
- Dispatcher
- Who booked it. Defaults to whoever creates the load.Why: The dispatcher's commission is counted from it.
What you will seeTap Publish. The driver gets a notification in his language and the load opens on its card with stops, steps, documents and money.
Common mistakesNo driver on the truck: a draft can be saved, but Publish needs a driver.Common mistakesChanging a stop after setting the miles: the form says Route changed — check the miles.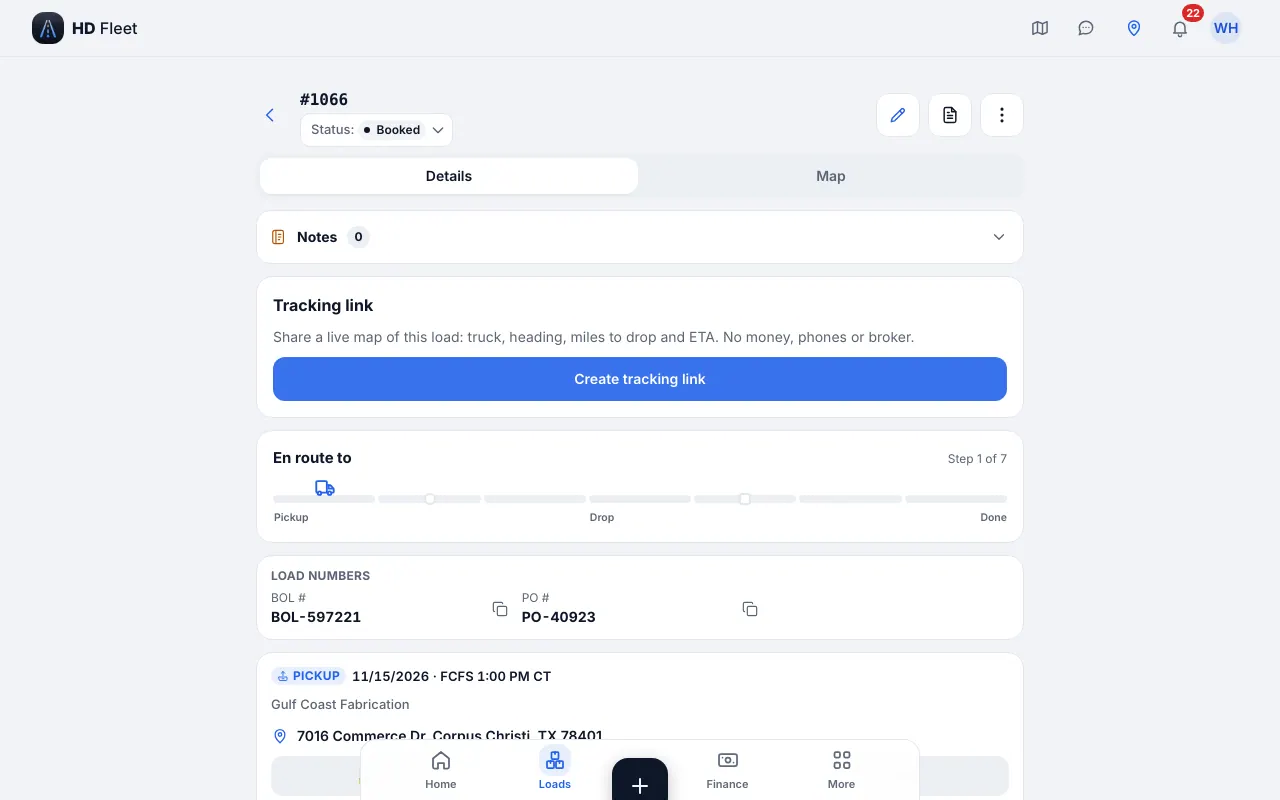
Website · Load card: stops, steps, documents, money
10
Documents and expiry dates
Every document of a load lives on its card and in Files. A POD is what lets you invoice. CDL, medical card, insurance and registration expire: HD Fleet reminds in time.
- Where to find it
- Website
- Workspace → Files → Scan; People & compliance → Documents & deadlines
- iOS app
- Workspace → Files → Scan; People & compliance → Documents & deadlines
- 1
Scan a rate confirmation, BOL or POD
Open Workspace → Files → Scan or Scan Document on the load. Photograph the paper flat and in good light, crop if needed, pick the type (rate con, BOL, POD, weighing, lumper receipt) and the load, then save. It becomes a clean PDF on the load.
TipDrivers do the same from their phone: the paper never waits for the office.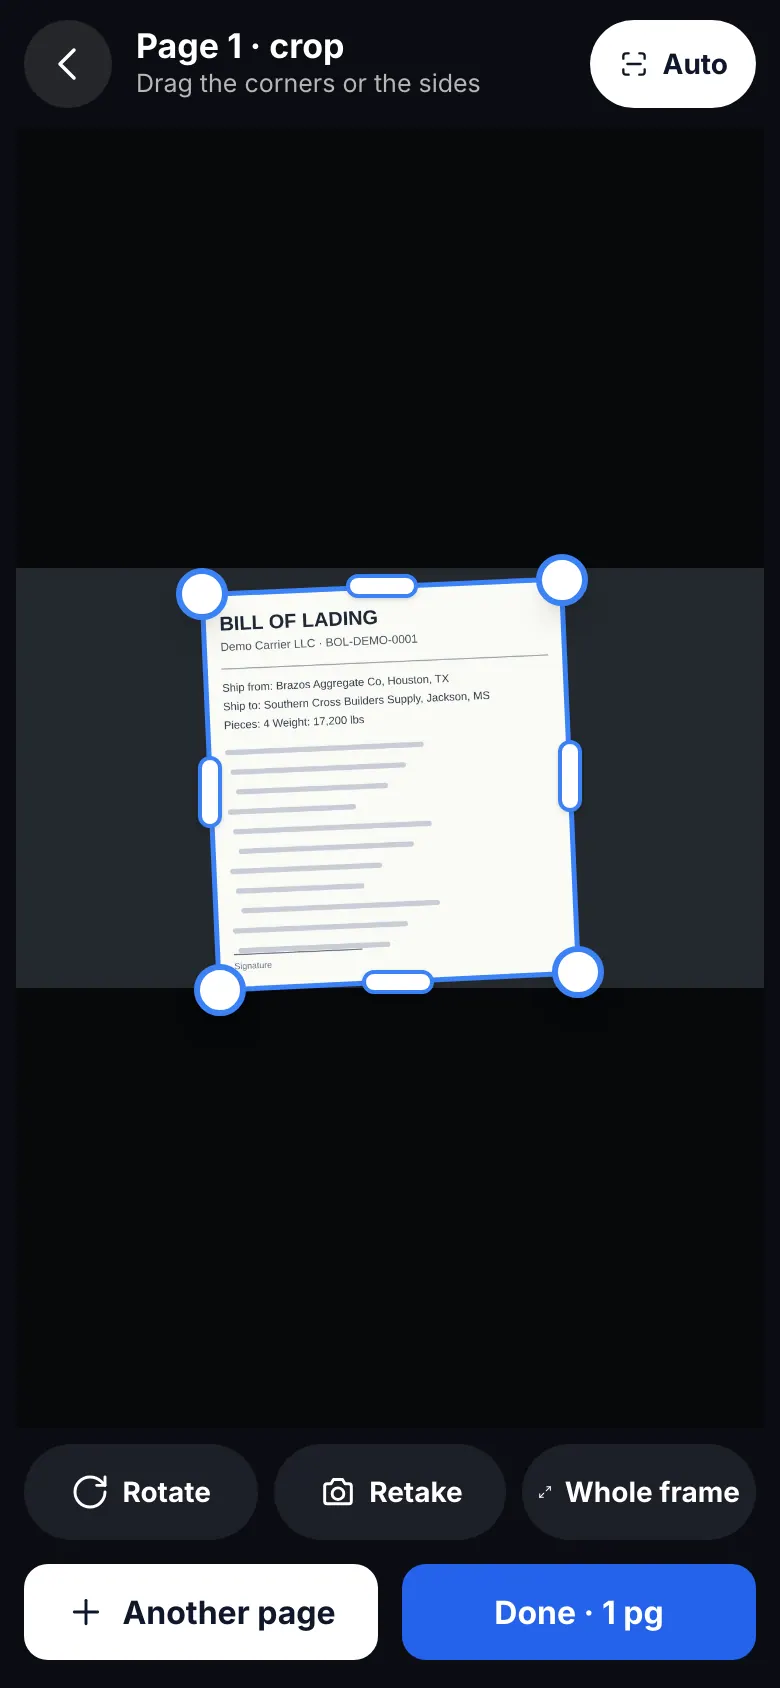
Website on a phone · Document scanner 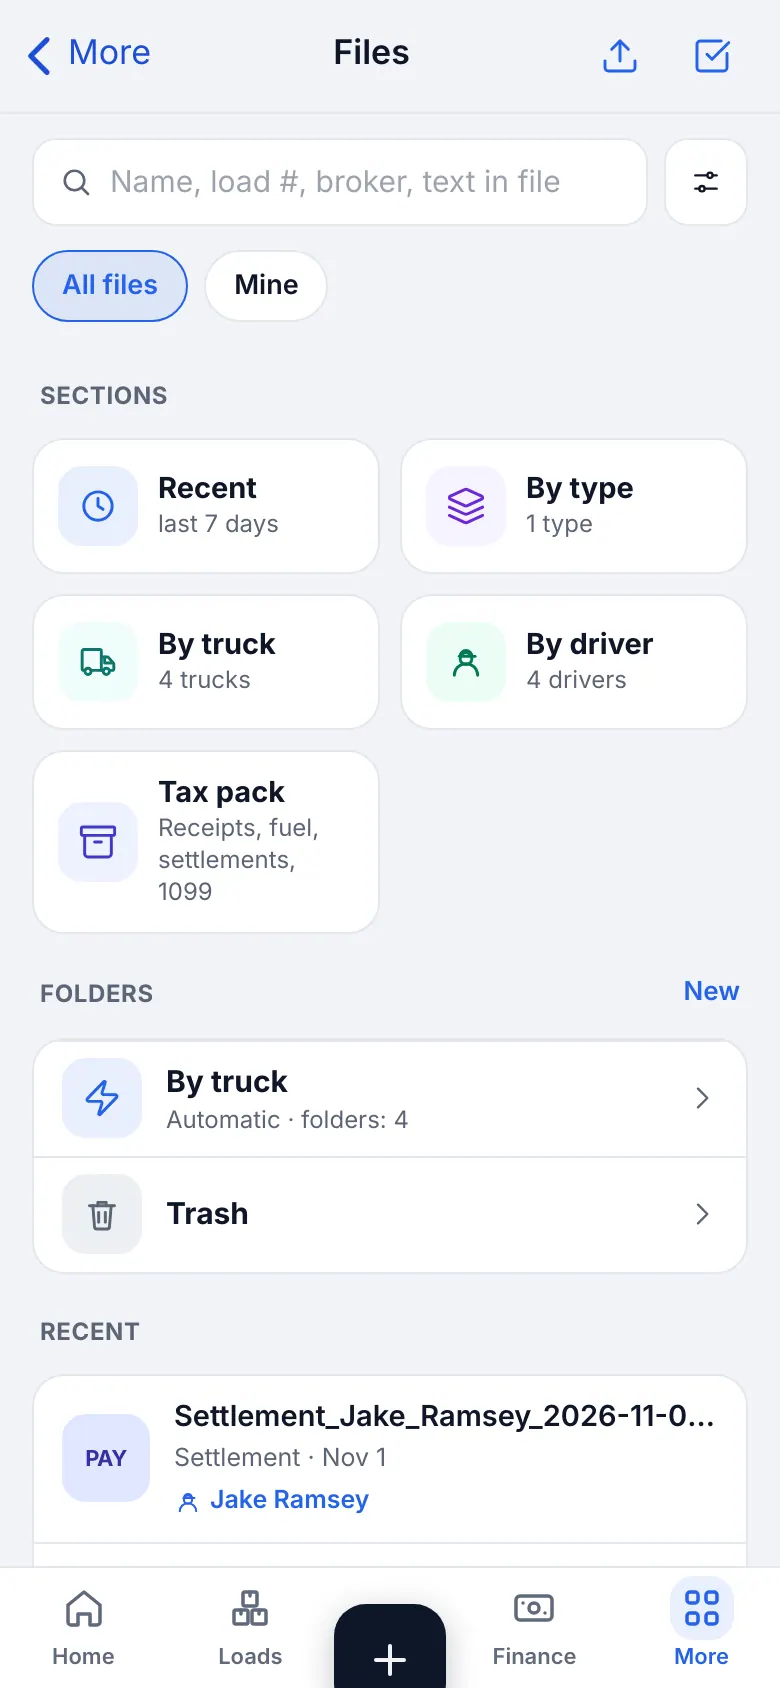
Website on a phone · Files: documents of loads, drivers and brokers - 2
Fill in the expiry dates
On a driver or truck open Documents and add the date of each document: insurance, registration, CDL, medical card. Documents & deadlines lists everything with the status Overdue, Soon, OK or No document. The driver is reminded 30 and 7 days before and when overdue. Use Remind for one extra message or Request to ask for an upload.
Fields
- Insurance until / Registration until
- The date printed on the document.Why: Reminders and the document list use it.Typical: 12/31/2026
TipDrivers without a W-9 are listed at the top. Send a one-time link: the driver types his tax number himself and you never see it in a message.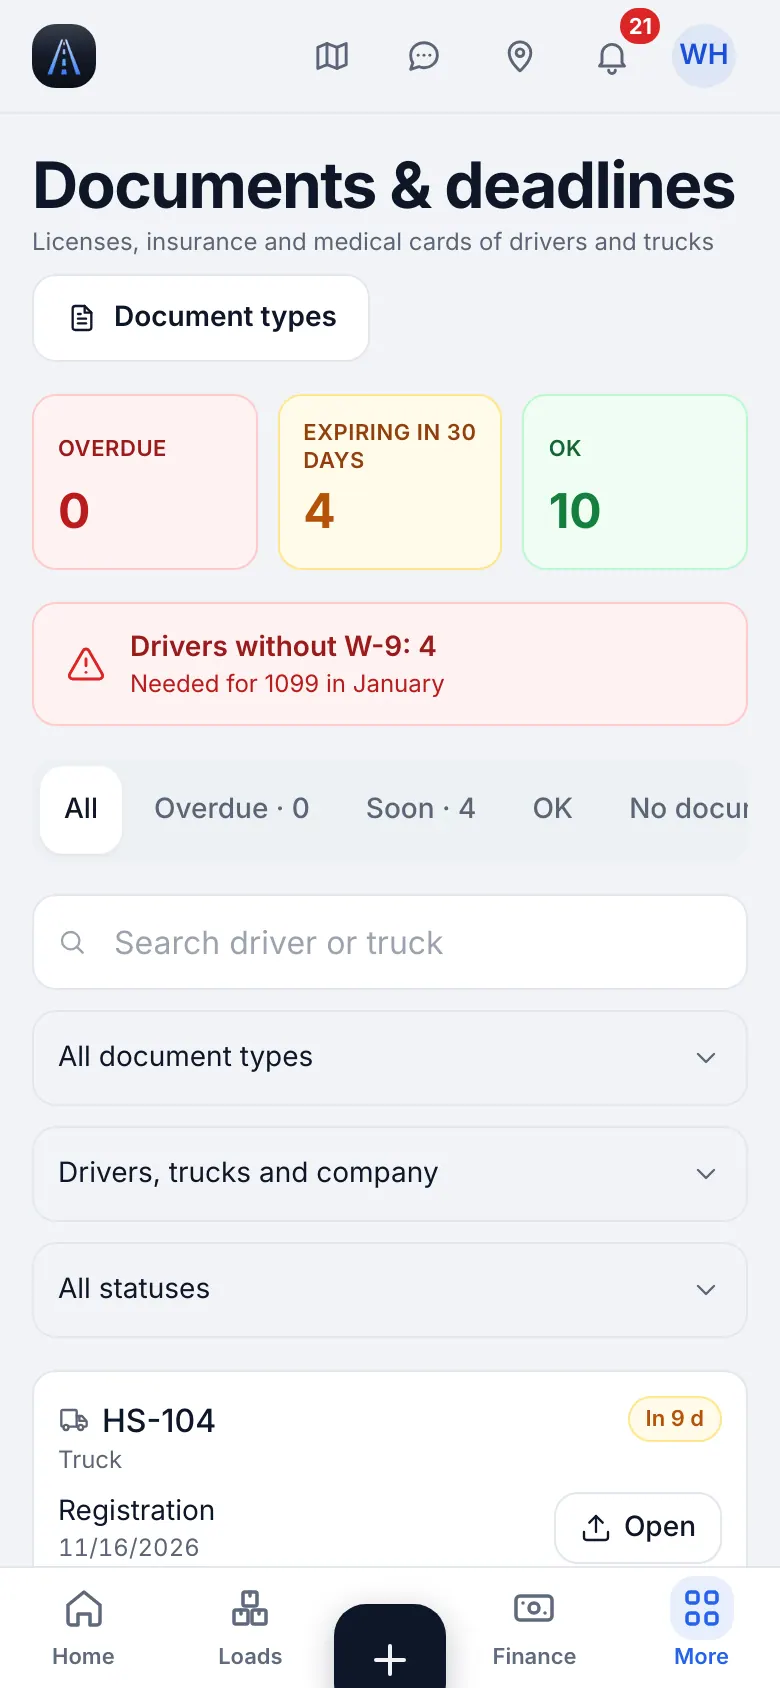
Website on a phone · Documents and deadlines on a phone
11
Receipts, expenses and fuel
Everything you spend, by truck and by category. Drivers add receipts from the phone; you add the rest.
- Where to find it
- Website
- Money → Expenses; Vehicle → Fuel logs
- iOS app
- Money → Expenses; Vehicle → Fuel logs
- 1
Add an expense with a receipt
Tap Add on Expenses (or “+” → Add expense). Choose the category, the truck, the date and the amount, and photograph the receipt. A repeated tap never saves twice.
Fields
- Category
- Fuel, maintenance, insurance, tolls, parking ... DEF and other non-fuel goes to DEF / Other.Why: Reports and profit group by it.
- Truckrequired
- The truck that paid.Why: Profit is counted per truck.
- Date and amountrequired
- As on the receipt.Typical: 86.40
- Receipt photo
- The whole receipt, flat.Why: Proof for the books and for the owner.
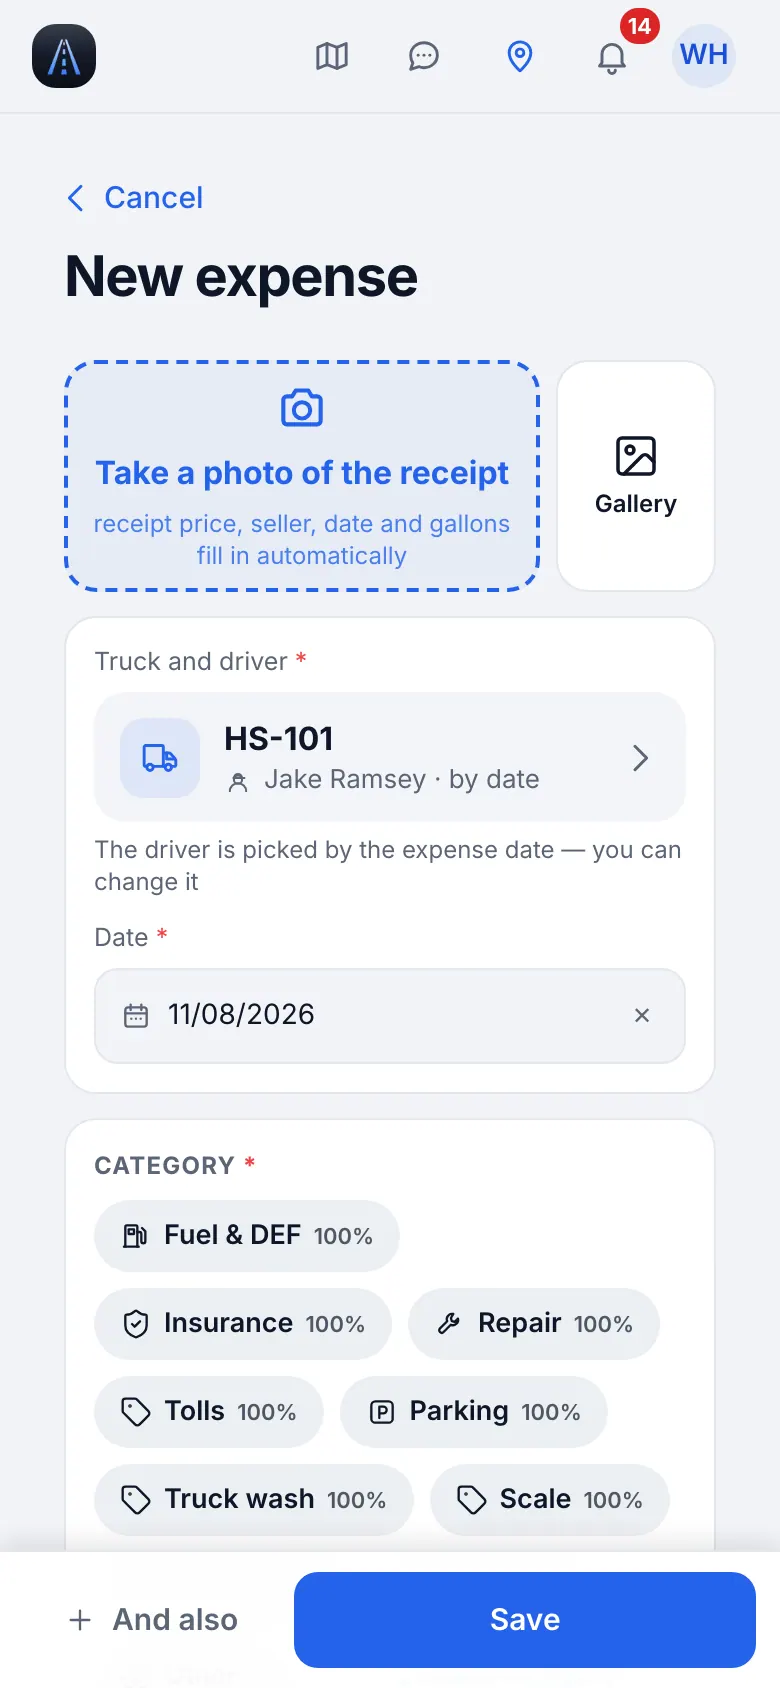
Website on a phone · New expense: category, truck, date, amount, receipt 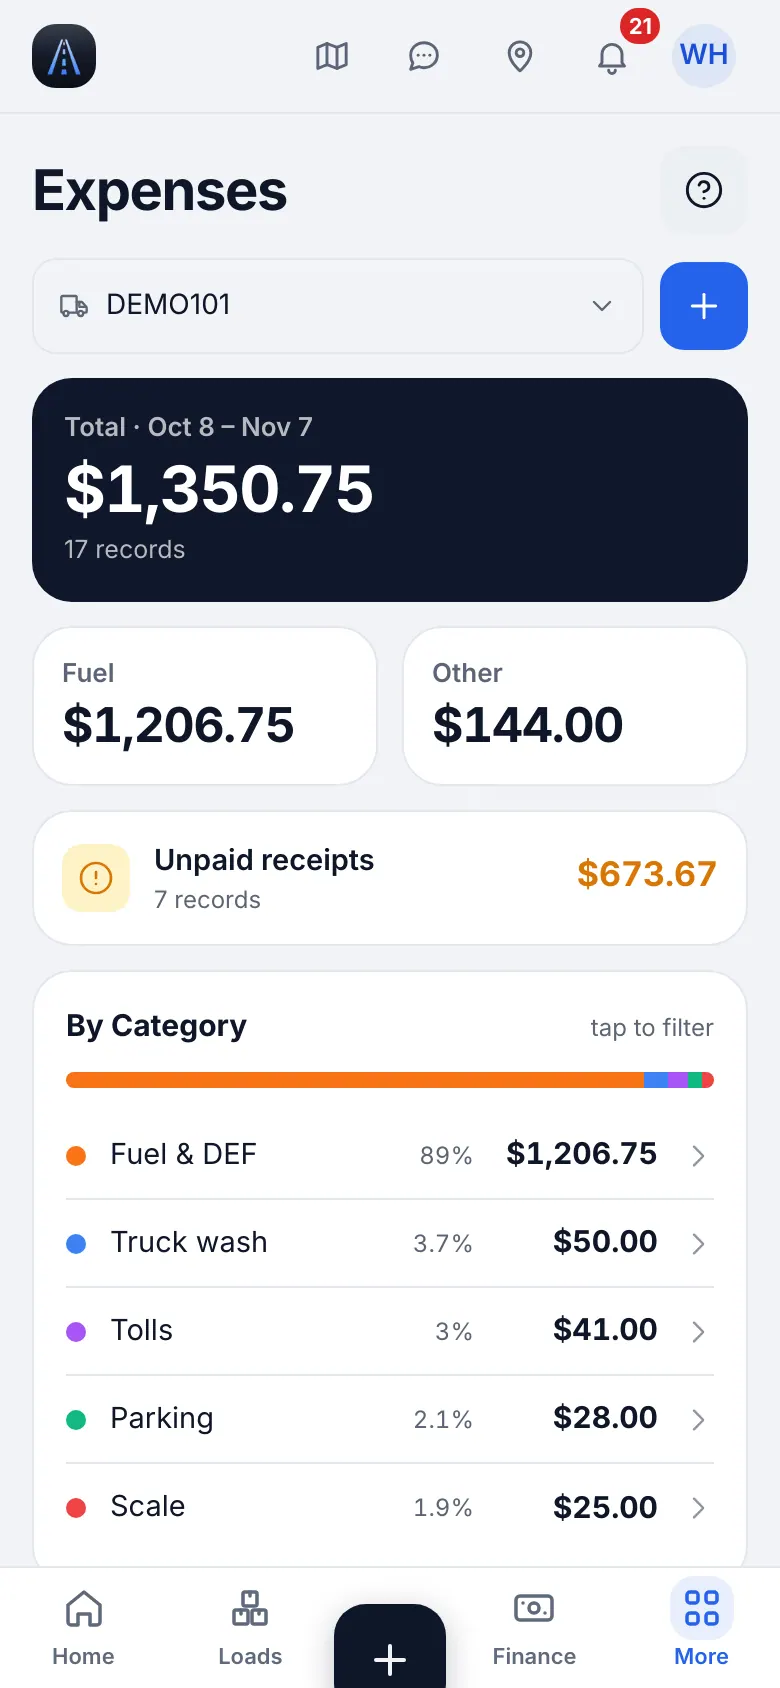
Website on a phone · Expenses on a phone - 2
Fuel: gallons, price and state
For a fill-up enter the gallons, the price per gallon and the state where you bought it. A fuel-card discount is handled: the price you really paid is used everywhere.
TipInsurance and truck payments go under Expenses → Recurring: they are spread over the weeks.TipA year of old receipts or a card statement: Workspace → Import data → Expenses and fuel.CarefulAlways enter the state. IFTA groups fuel by it, and a fuel line without a state goes to the error list.
12
Service records and «What is next»
Each time a truck is serviced, add a record. The app then says what is next, by miles or by date.
- Where to find it
- Website
- Fleet → Maintenance; Vehicle → Maintenance
- iOS app
- Fleet → Maintenance; Vehicle → Maintenance
- 1
Add a service record
Tap + Service record (or New visit) on the service book of a truck. The form says Intervals and the next service are worked out for you.
Fields
- Jobs done
- Tick what was done: oil, filters, brakes, tires ...Why: Each job restarts its own interval.
- Date and odometerrequired
- The day and the mileage of the visit.Typical: 445,200
- Cost and shop
- What you paid and where.Why: Totals per truck and per year.
- Receipt photo
- Take or choose from the library.Why: Saved with the visit and the expense.
- Add to vehicle expenses
- Tick to add one expense entry with the receipt.Why: No double typing: the visit is also in your expenses.
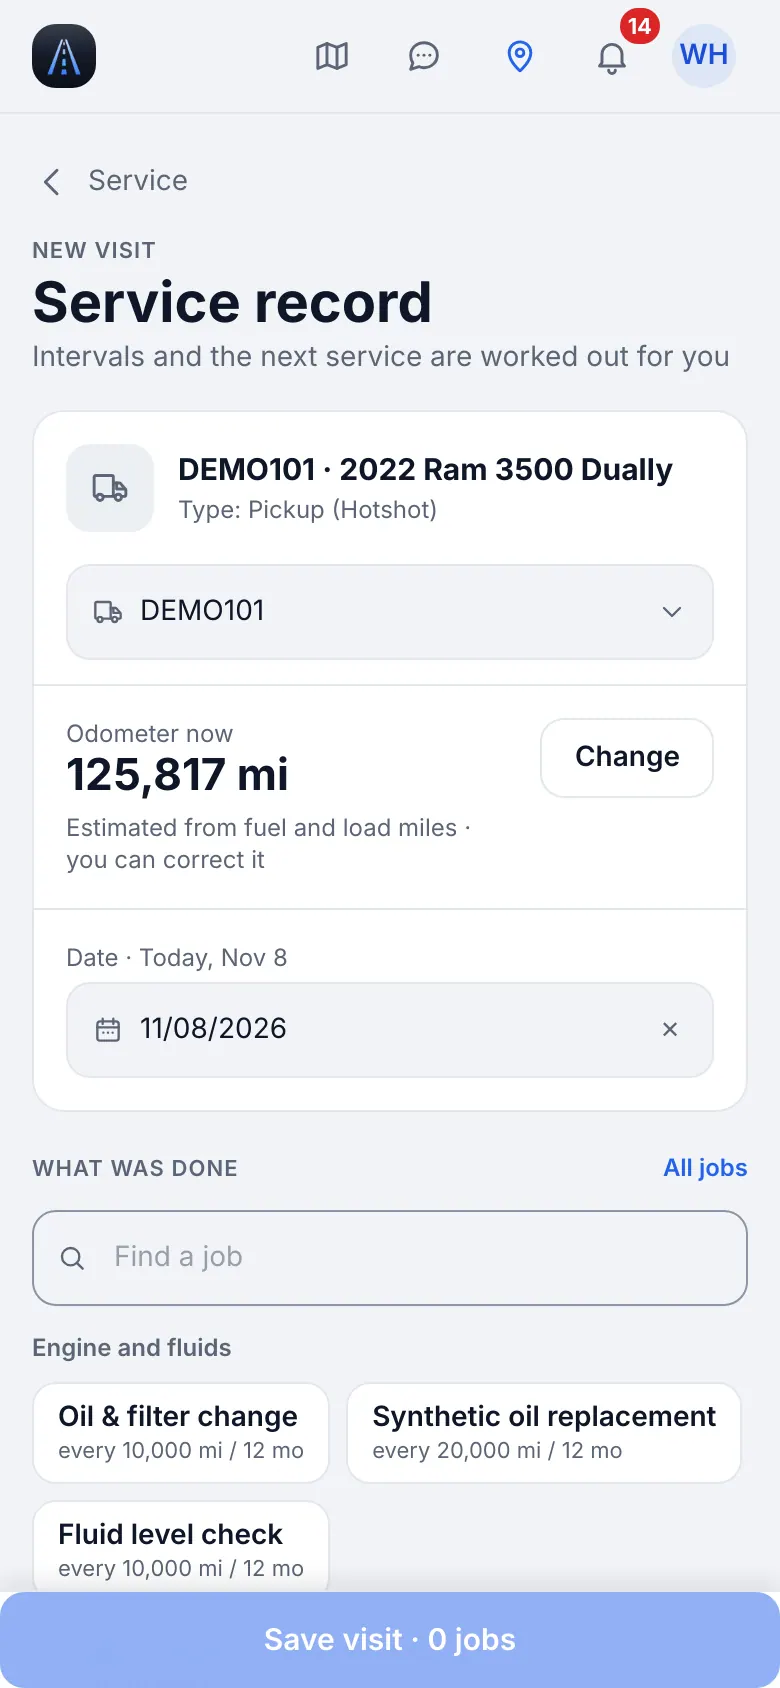
Website on a phone · Service record: jobs, date, odometer, cost, receipt - 2
Read «What is next»
The service book shows What is next: each job with miles or days left. Overdue and Soon show on Maintenance and on Home. Tap Done next to a job: it opens the record with the job already chosen. Snooze silences a reminder for a week, two weeks or a month; a new record cancels the snooze.
TipIntervals are set by vehicle type under Intervals; for one truck use + Custom interval.TipPDF for sale makes the service history as a document.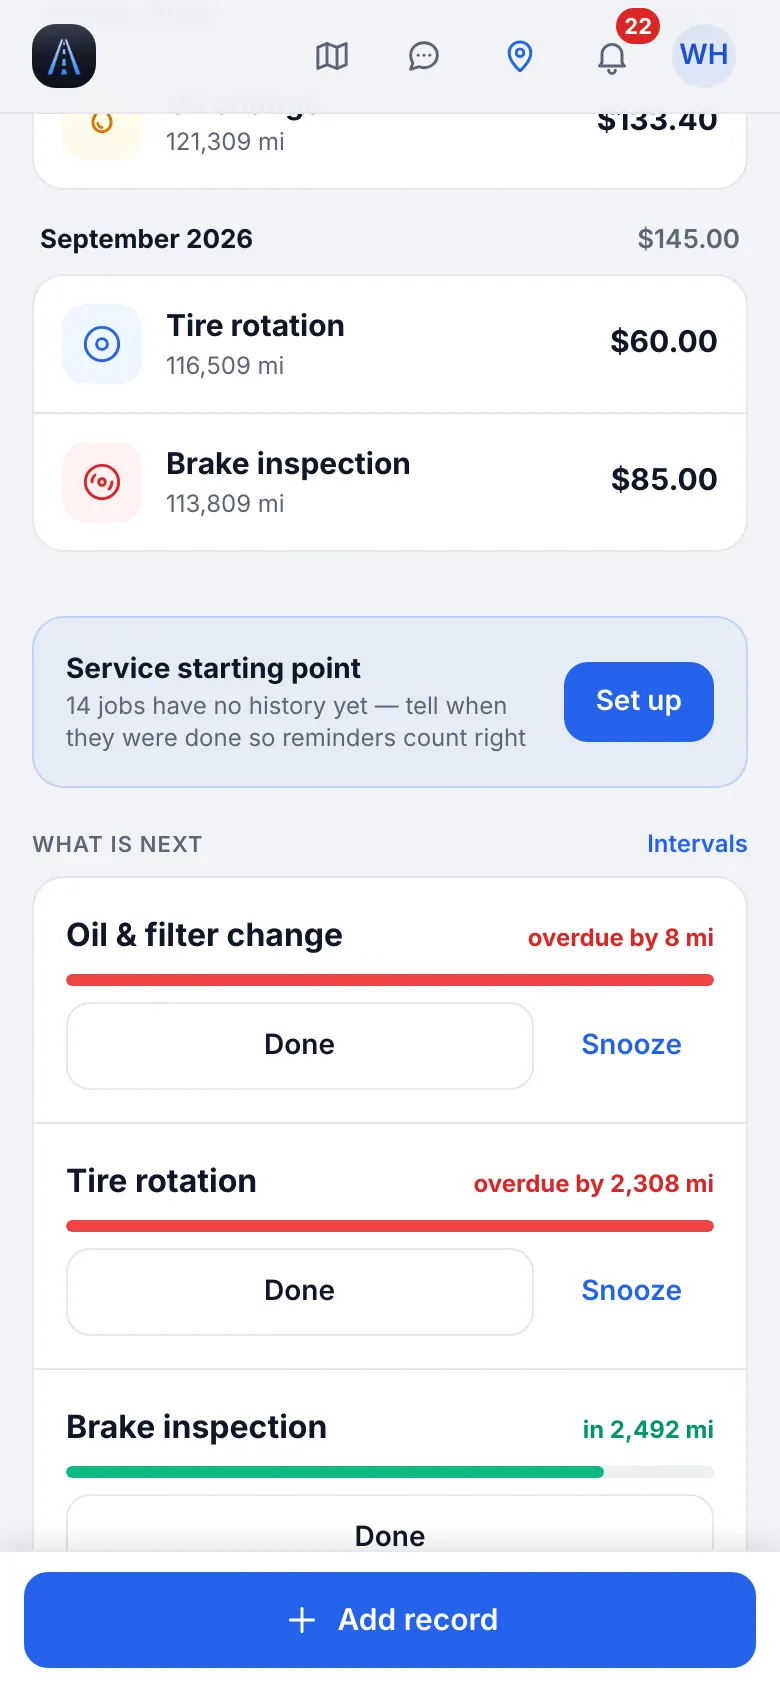
Website on a phone · Service book of a truck with «What is next» - 3
Requests from drivers
A driver can send a repair or oil receipt from the app. It waits under Service requests until you approve or reject it.
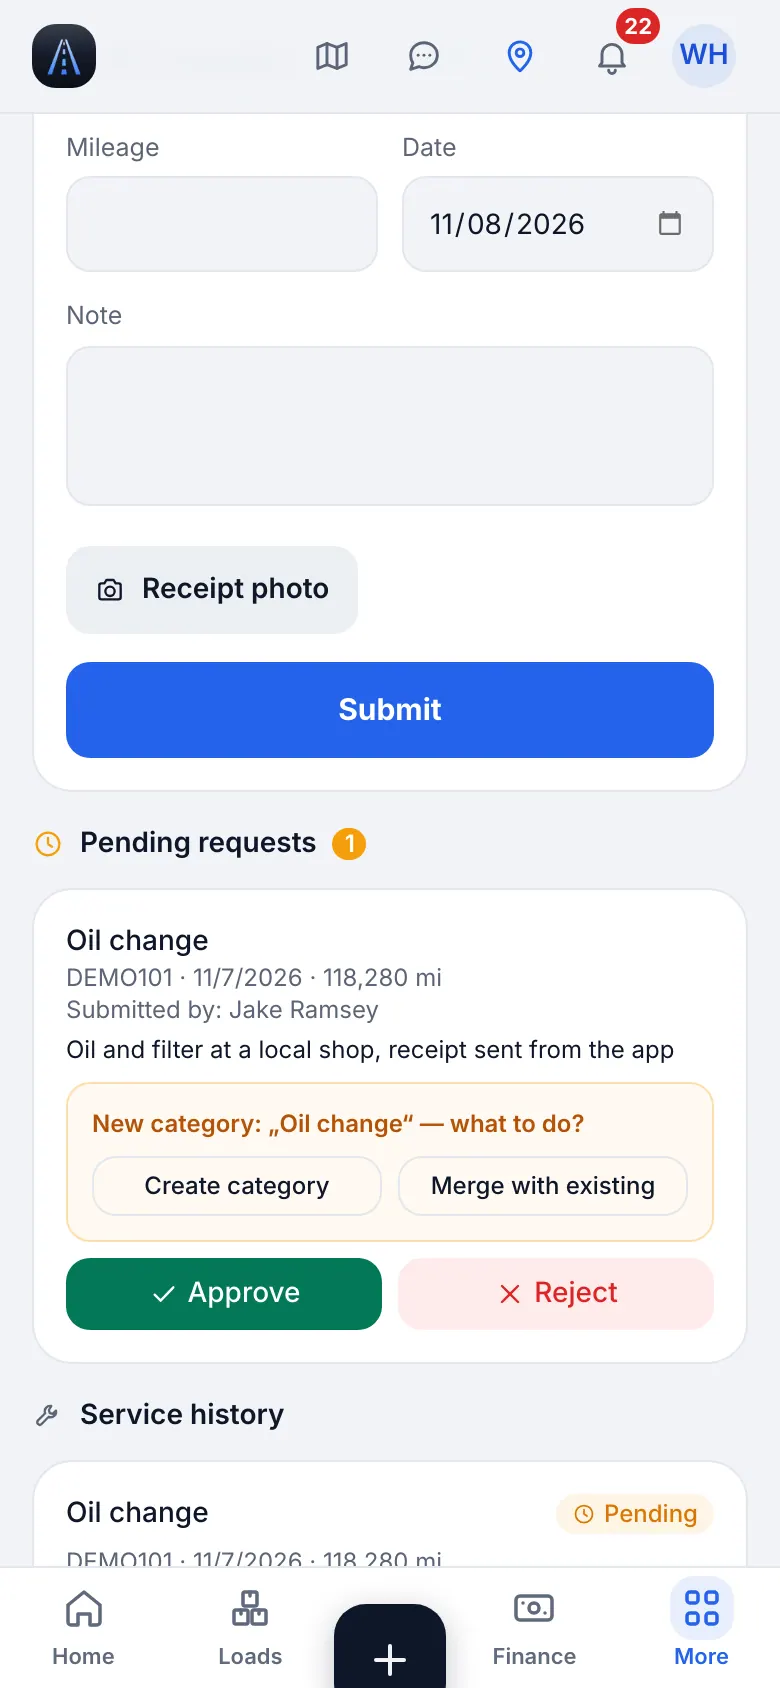
Website on a phone · Service requests from drivers: the queue of pending receipts
13
Invoices and factoring, and getting paid
Deliver the load, attach the POD and send the invoice. Record what the broker pays: what is left stays visible until it is collected.
- Where to find it
- Website
- Money → Invoices & receivables
- iOS app
- Money → Invoices & receivables
- 1
Issue and send the invoice
Open the delivered load and issue the invoice (a number such as INV-0001 is assigned). Tap Send: pick the recipient (the broker's billing e-mail) and what to attach: the invoice PDF, the rate confirmation and the BOL/POD. PDF downloads it instead; Send again re-sends.
CarefulWith no load documents yet only the invoice PDF goes: scan the POD first.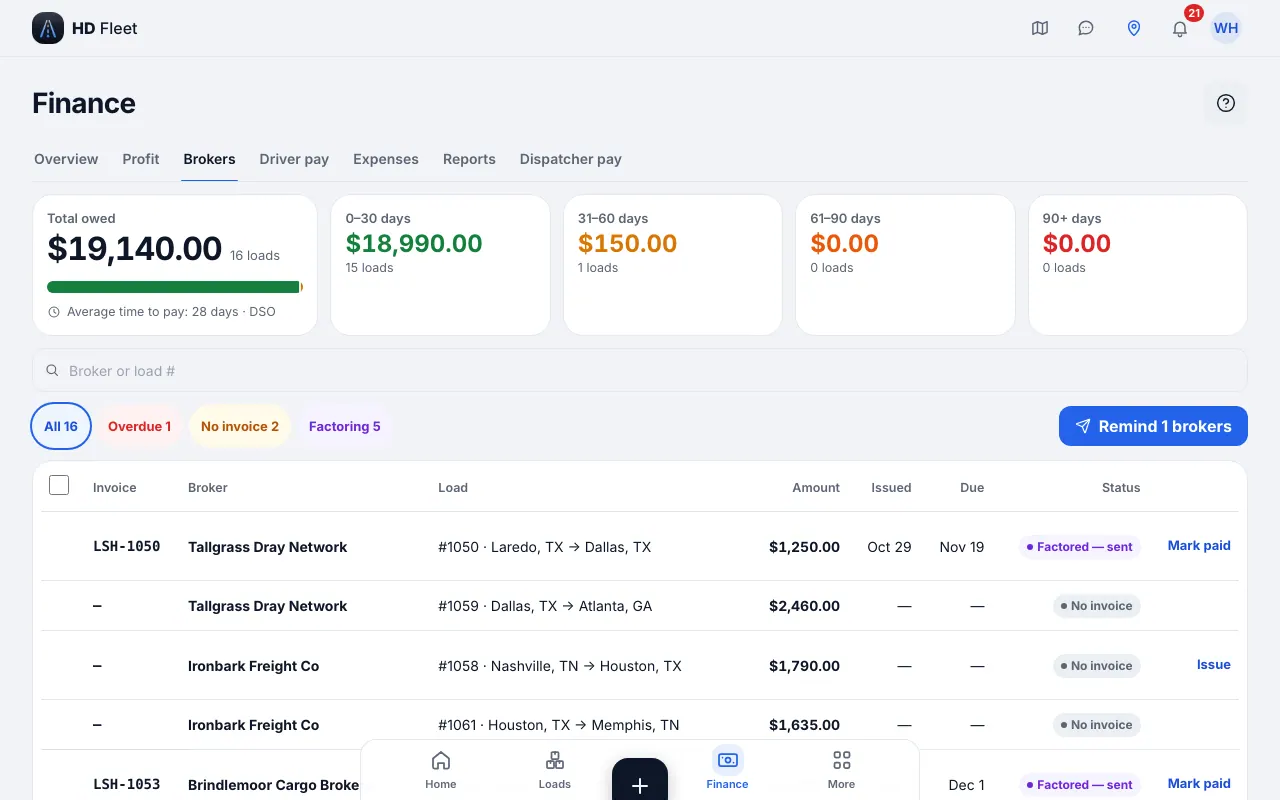
Website · Invoices & receivables: what brokers owe, open and factored invoices (Money → Invoices & receivables) 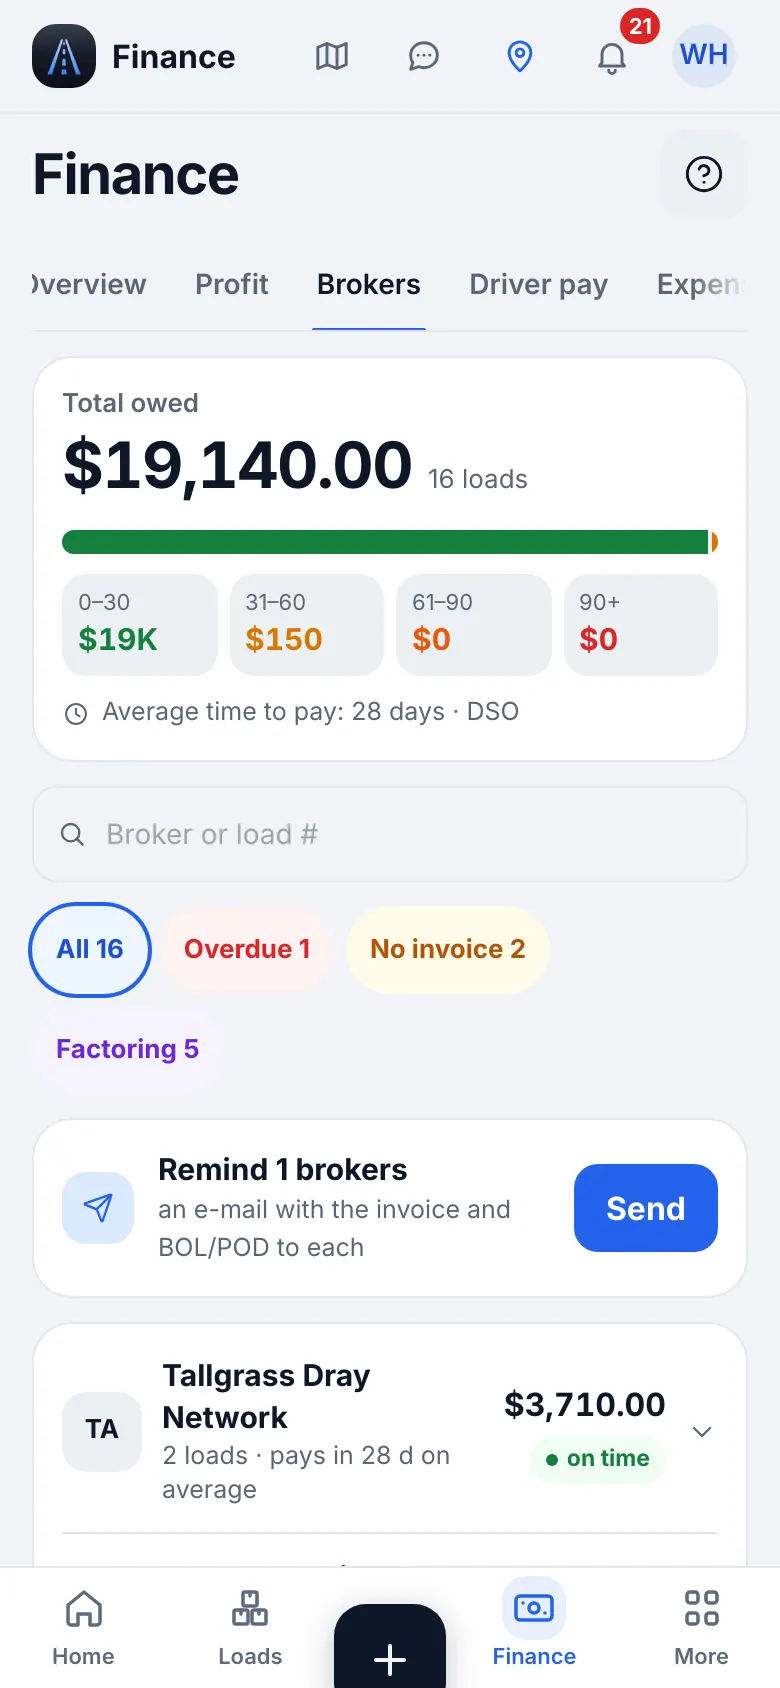
Website on a phone · Invoices & receivables on a phone - 2
With a factor: send the invoice to the factor
If a factor buys your invoices, send the invoice to the factor instead of waiting. Mark when the advance arrives and when the reserve is released. Each invoice is split into advance, fee and reserve by the terms you set.
- 3
Record the payment
When the broker pays, open the invoice and tap Paid in full, Partial or Short pay. Enter Amount received, $ and the date, then Save payment. What is left stays in what brokers owe you and in the aging report.
Common mistakesMarking an invoice paid before the money arrived: use Partial for what really came.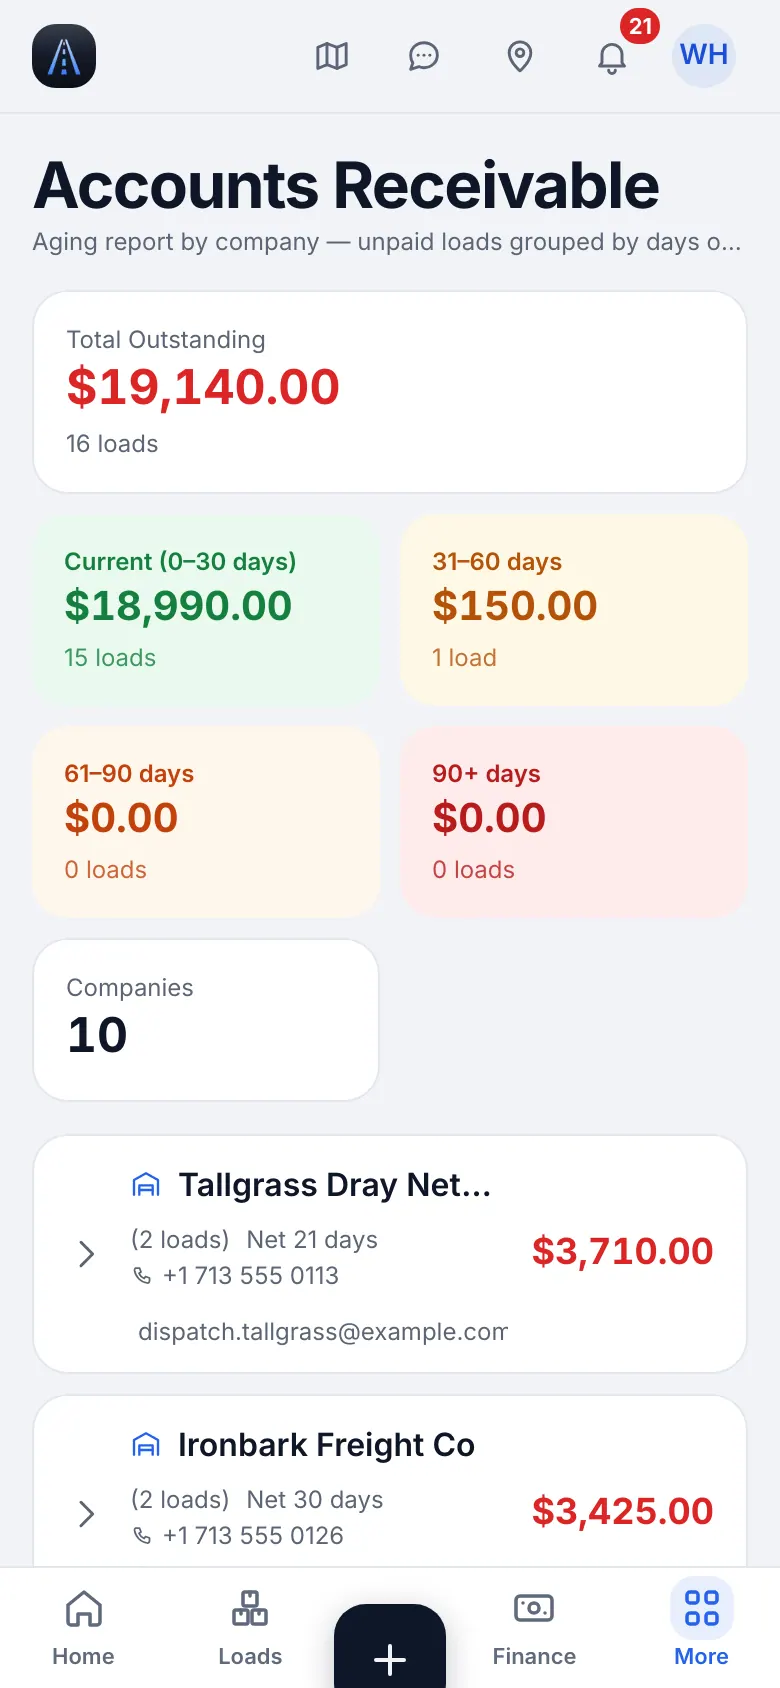
Website on a phone · Invoices & receivables › Aging on a phone
14
Driver settlements and advances
A settlement is one driver on one truck for one week: loads, fuel and expenses of that week, and what the driver is paid. Drivers can ask for advances.
- Where to find it
- Website
- Money → Driver pay
- iOS app
- Money → Driver pay
- 1
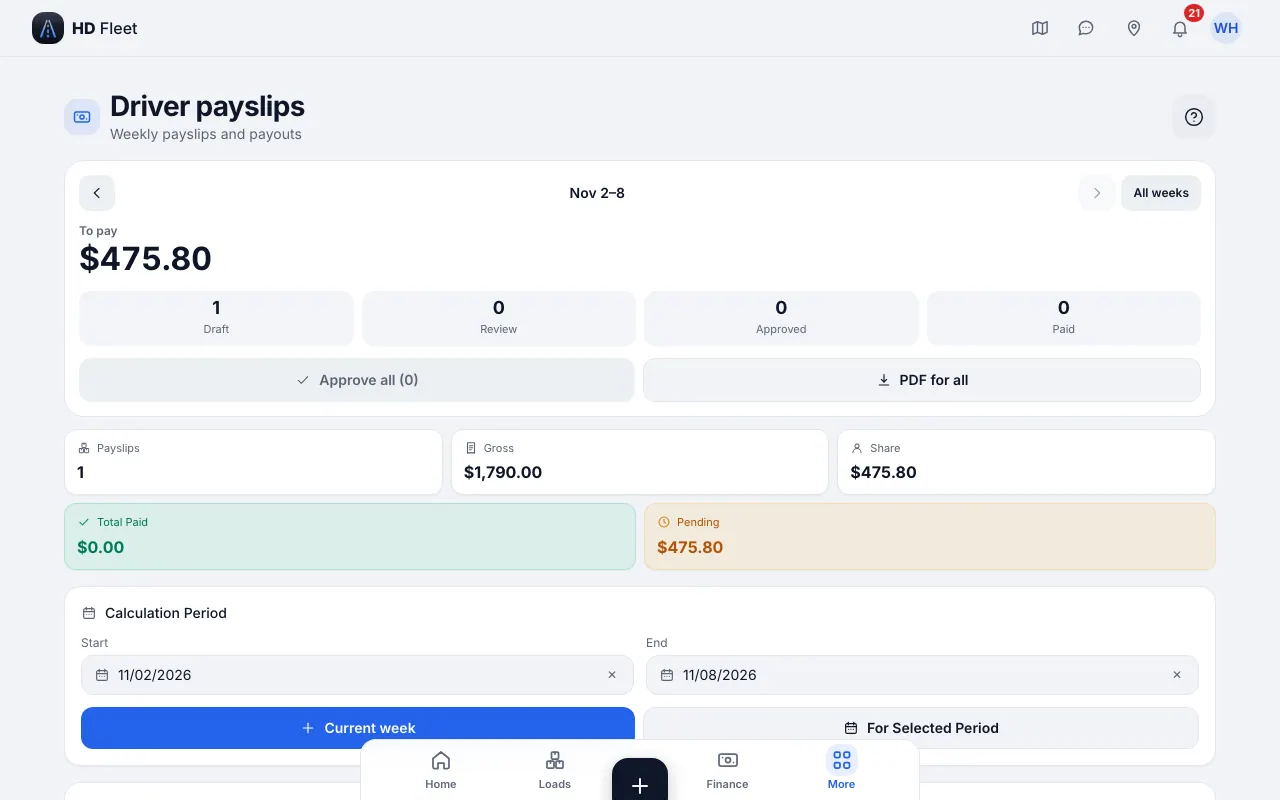
Generate the week
Open Driver pay, choose the week and generate. The driver share follows his pay model, with or without empty miles. TONU, detention and layover follow the pay rules. Weeks start on the day set in the company settings.
Website · Driver settlements 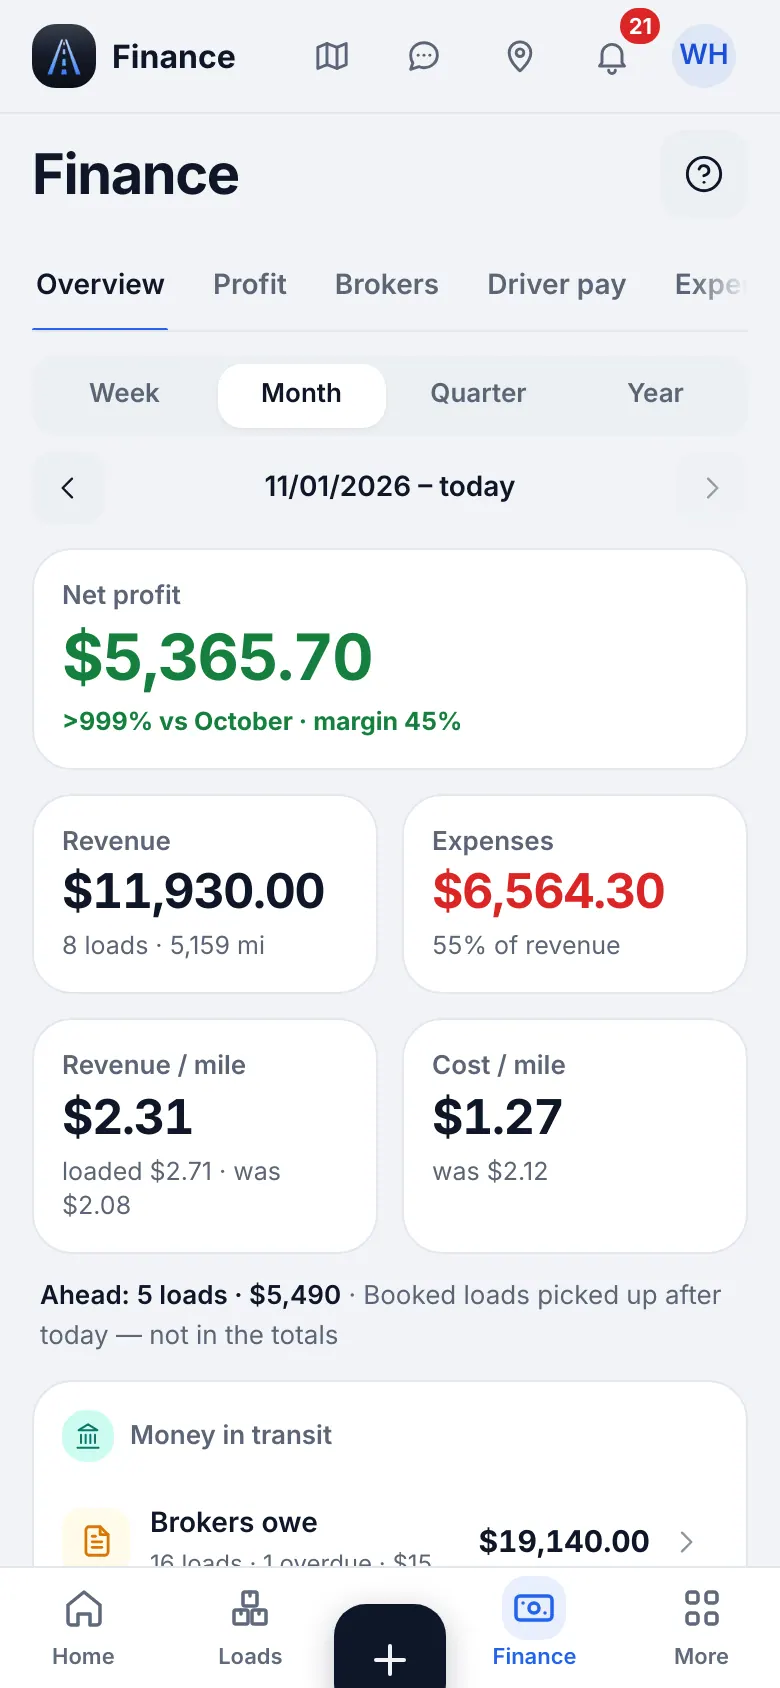
Website on a phone · Finance on a phone - 2
Review and pay
A line without a driver share or driver is marked needs review and blocks approval: fix it and recalculate. The status goes Draft → On review → Approved → Paid. Records in an approved or paid settlement are frozen; Reopen to correct. If the net is negative use Close with balance carried: it closes with $0 paid and the debt comes off next week.
What you will seeThe driver sees the settlement in the app only after you issue it, with the fields you allow.
TipAdvances: the driver taps Request an advance. You see it under Advance requests: Give or Decline. An approved advance comes off the settlement.
15
You are set up: your daily and weekly routine
The setup is done. From now on the work is short.
- 1
Every day
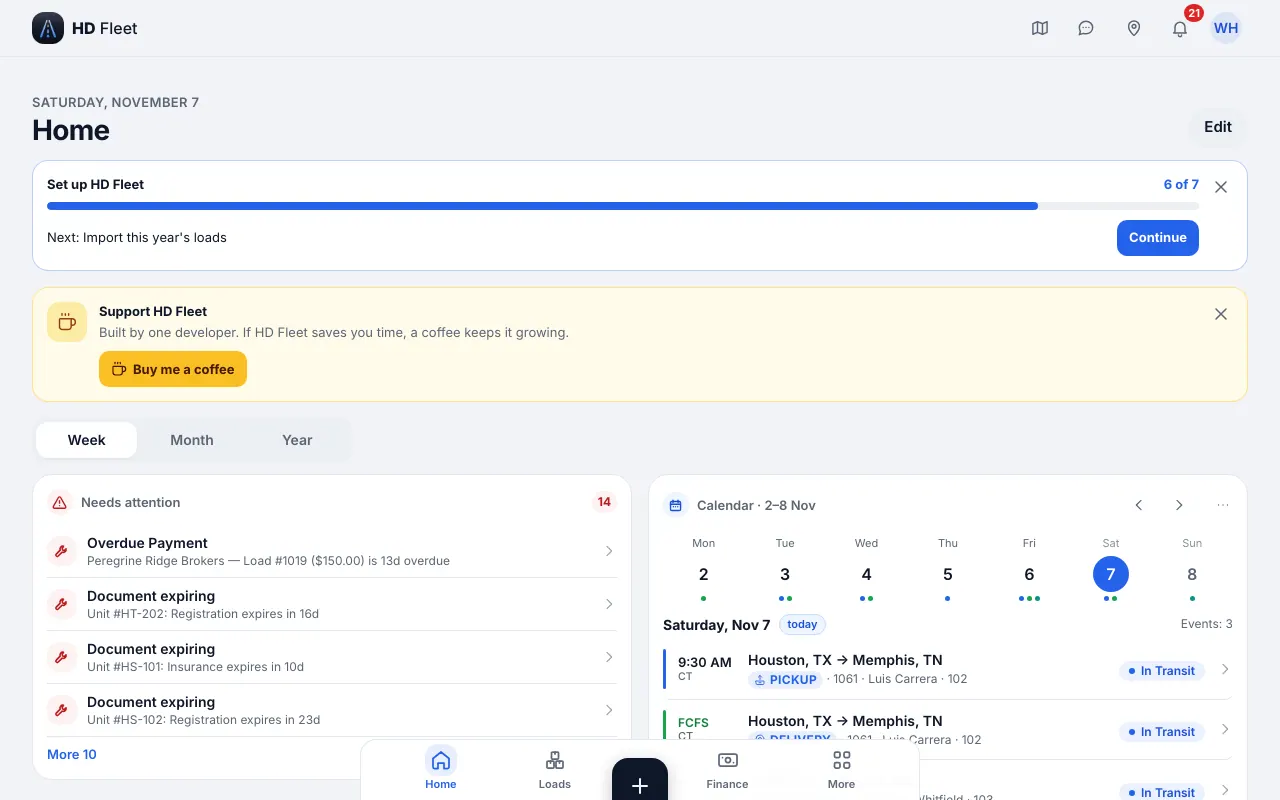
Create or import loads, check Home and the map, answer messages. The driver does the steps and the paperwork in the app; you see it live.
Website · Home on the website: today, money of the week and the checklist - 2
Every week
Send invoices for delivered loads, record payments, generate and pay the settlements, add the receipts that are missing, look at What is next for every tractor.
- 3
Every quarter
Open the IFTA report: miles and fuel by state are already there if every fuel line has its state.
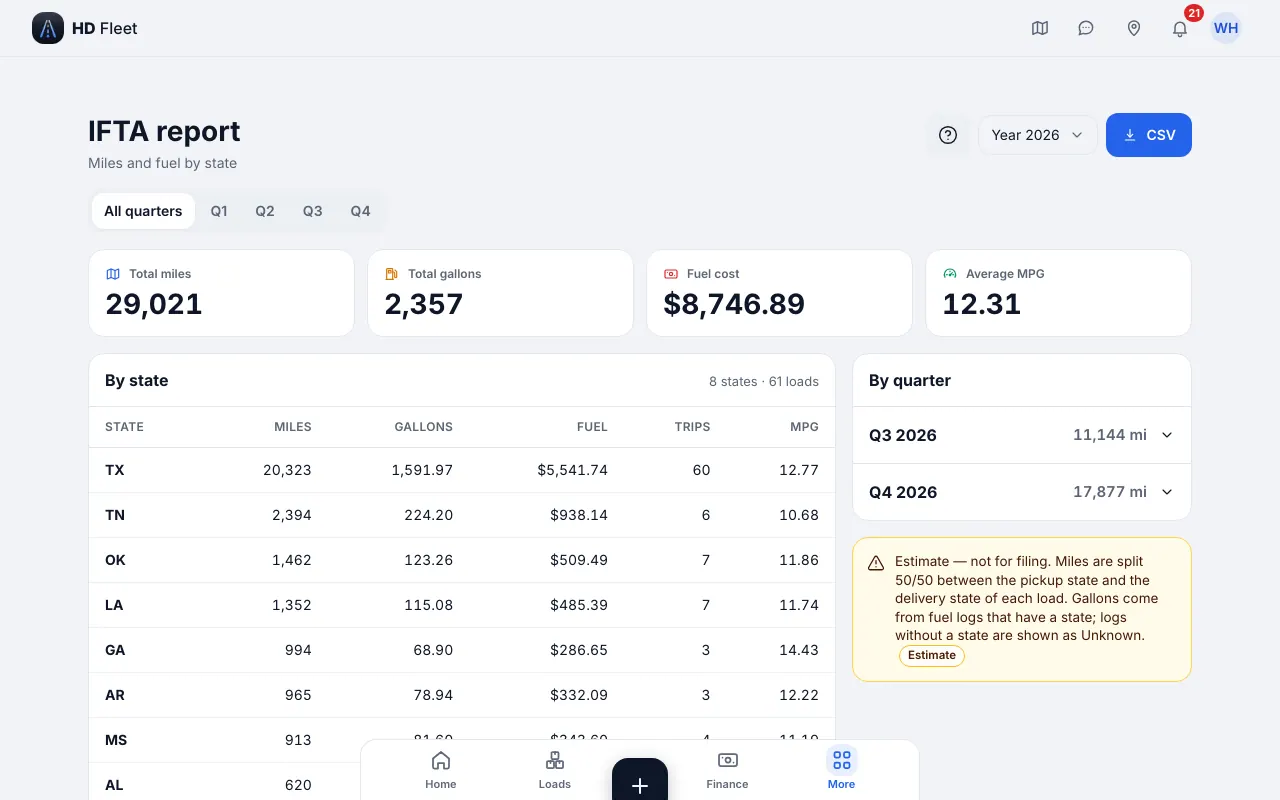
Website · IFTA report: miles and fuel by state - 4
Next
Give your drivers the driver guide: it explains the app step by step. Open it from the link at the bottom of this page.